Sarvangasana (Shoulderstand Pose)
What is Sarvangasana (Shoulderstand Pose)?
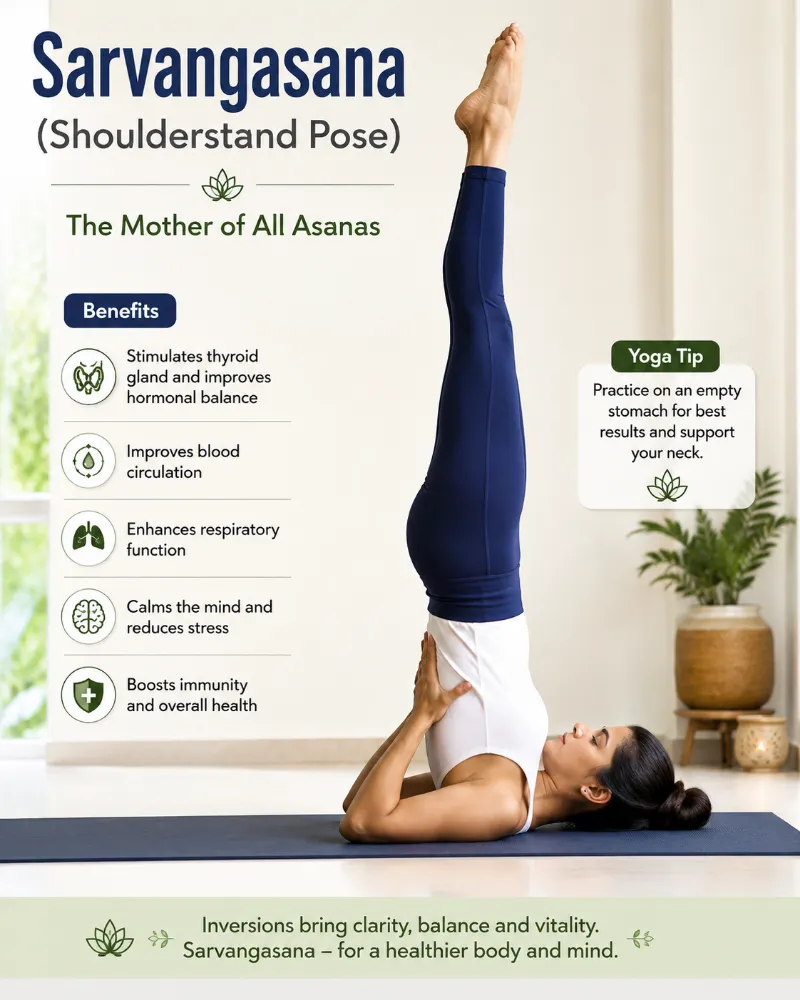
In contemporary yoga practice, Sarvangasana, also known as Shoulderstand, is an intermediate-level inversion pose. This inversion pose strengthens your leg and abdominal muscles while stretching your neck and shoulders.
This yoga pose has special therapeutic advantages for your respiratory system and thyroid gland. Additionally, as the name suggests, Shoulderstand affects the general health and function of your body’s muscles.
Overview & Etymology
The name Sarvangasana comes from the Sanskrit words Sarvang, which means “all limbs” (i.e., the whole body), and Asana, which means “Posture,” “Position,” or “Seat.”
Although Sarvangasana is a recent name, related yoga poses such as Viparita Karani existed before.
Such versions of the Shoulderstand pose were noted in a 14th-century Sanskrit text on yoga: Śiva Saṃhitā, a 15th-century classic yoga manual: Haṭha Yoga Pradīpikā, and a 17th-century yoga Sanskrit text Gheraṇḍa Saṃhitā.
Yoga scholars have guessed that this modern name Salamba Sarvangasana is mentioned in Krishnamacharya’s book Yoga Makaranda around 1934.
- Sanskrit Name: सर्वाङ्गासन
- Pronunciation: sar-van-GAHS-anna
- Pose Type: Inversion
- Also known as: Shoulderstand, Salamba Sarvangasana
- Strengthens: Vertebral Column, Neck, and Shoulders
- Stretches: Spine and Shoulders
Which muscles are used in sarvangasana?
- Neck flexors
- Shoulder flexors
- Erector spinae
- Rhomboids and trapezius
- Abdominal muscles
- Quadriceps
- Hamstrings
- Calf muscles
- Wrist and Forearm
Health Benefits of Sarvangasana
- Improves blood circulation in the whole body.
- Increases blood circulation inside the brain.
- Strengthens the shoulders, core, back, and neck.
- Improves the functioning of reproductive organs.
- Improves metabolism and helps in losing weight.
- Increases blood flow in the eyes, which can improve vision.
- Increases the spine’s strength and flexibility.
- Activates proper functioning of the thyroid and parathyroid glands.
- Helps lessen insomnia symptoms by calming the brain.
Contraindications
Consult your physician before doing the Sarvangasana if you have any of the following health conditions:
- Pregnancy,
- Menstruation
- High Blood Pressure
- Heart Problems
- Glaucoma
- Slipped Disc
- Spondylosis
- Neck Pain
- Acute Thyroid Problems.
Supported Shoulder-stand?
- Bend firm blankets into one-by-two-foot rectangles and stack two or more of them on top of one another. Keeping the upper arms in place throughout the pose could be aided by covering the blankets with an adhesive pad.
- Because your upper body is supported and ready to be one of the larger corners, sleep on the blankets with your head on the ground.
- Put your arms close to your chest before putting your feet flat on the ground with the heels at your sitting bones. You should flex your knees.
- Breathe out, draw your thighs toward your front body, slam your arms into the floor, and raise your feet off the ground.
- As you elevate, pull your knees closer to your face by curving your pelvis and then your back torso away from the floor.
- Stretch your arms until the blanket’s edge aligns with your fingers, your thumbs are facing behind, and your fingers are touching the floor.
- To bring them closer together, flex your elbows.
- Raise your pelvis above your shoulders until your upper back is roughly perpendicular to the ground.
- Make sure your elbows are no wider than shoulder-width apart as you walk your hands up your back (toward the ground).
- Raise your bent knees toward the roof as you inhale, dangling your heels by your buttocks and keeping your thighs parallel to your upper torso.
When to Avoid Performing Sarvangasana
Avoid during menstruation.
- Avoid if you have high blood pressure.
- Avoid during the final trimester of pregnancy.
- Steer clear if you have severe sinus headaches or migraines.
- Avoid if you’ve recently had surgery on your neck, back, legs, or spine.
- Steer clear if you have acute thyroid issues, a slipped disk, or spondylosis.
- Steer clear if you experience excruciating discomfort in your lower back, neck, shoulders, or legs.
The follow-up poses for Sarvangasana?
- Halasana
- Purva Halasana
- Eka Pada Sarvangasana
Sarvangasana Beginner’s Tip?
- Maintaining a straight path for the body.
- Keeping a healthy balance.
- Breathing through the abdomen.
- Additionally, the throat and thyroid may be indicated.
How to do Sarvangasana (Shoulderstand Pose)
Sarvangasana is a pose that anyone who wants to improve their yoga practice can take up. Even though it’s not recommended for novice yoga practitioners, shoulder stand posture variants and modifications might help you start building strength.
Thus, before you begin, read the following to learn about the four components of Sarvangasana practice:
Part 1 – Preparatory Poses for Sarvangasana
It’s crucial to warm up your body before performing Sarvangasana because it’s one of the hardest poses in the Ashtanga style of yoga.
Let’s examine three methods to get the key muscle groups ready for your shoulderstand exercises.
- Lift your entire core into the air while lying on your back. You will use your hands, feet, and shoulders to support yourself while in this stance.
Your shoulder, neck, and leg muscles will be strengthened in this posture, which will improve your flow into the last Sarvangasana practice.
Ardha Halasana (Half Plough Pose)
- With your back against the floor, lie down on the yoga mat. Raise both legs in the air now.
Tuck your belly in, make a 90-degree angle with your legs, and maintain a strong core throughout.
Halasana (Plough Pose)
3. Proceed to the full Plough Pose by continuing from Half Plough Pose. To hold this pose, just lower one leg to the back of your head, then lower the other leg into the same position.
Make sure your knees are positioned in a straight line on top of your ears to ensure proper alignment. All of the key muscles that are used more extensively in the Shoulderstand will be engaged in this pose.
Part 2: Step-by-Step Instructions to Perform Sarvangasana
- Step 1: With your feet flat on the mat and your arms relaxed at your sides, lie on your back and bend your knees.
- Step 2: Breathe regularly and at an average pace while keeping both arms flat on the ground.
- Step 3: Gently raise your hips and legs off the mat until they are perpendicular to it, as in the Half Plough Pose.
- Step 4: Take a breath, press your palms down on the floor, and raise and support your hips with your hands and triceps.
- Step 5: Lift your lower back off the mat in a straight, vertical motion after fully exhaling.
- Step 6: Keep your shoulders active as you draw your shoulder blades toward your upper back. Breathe steadily and smoothly.
- Step 7: Hold yourself erect vertically with your head flat on the mat and your arms behind your back to support your legs and core.
- Step 8: After holding this pose upright in the air for a few minutes, release your hands from your back and carefully lower your legs back to the ground.
Breath Awareness:
- Inhalation: Inhale deeply while lifting your back.
- Exhalation: Release the pose and put your back on the ground as you exhale.
- For beginners, hold the shoulderstand position for 20 to 60 seconds.
- Performance Duration for Advanced:
- For one to three minutes, hold the Shoulderstand stance.
Part 3: Things to Keep in Mind
Here are some crucial postural clues to pay attention to if you are attempting Sarvangasana for the first time:
- Avoid hurrying into the Shoulderstand stance because it puts your shoulders, neck, and spine in danger. Therefore, it’s important to maintain a very constant and slow posture transformation. Rushing or jerking can cause the neck or spine to shift, which could seriously harm the spine.
- Around you, use safety props: If you find it difficult to maintain an upright posture while performing Sarvangasana, you can adjust the position by placing soft pillows or bolsters on the ground around you. This will guarantee a safe landing even if your equilibrium isn’t ideal.
Part 4: Relaxing Poses After Sarvangasana
When you hold the Shoulderstand for extended periods of time, your body flexes to its fullest. In order to restore the natural shape of your neck and spine, it is crucial to do resting counterposes. Here are three stances that will help you fully unwind.
- After performing Sarvangasana, lie down in a five-point star position with your arms and legs spread. Sink your body into your yoga mat to release tension in each muscle group.
For a more profound release of stress, you might improve your breathing technique and close your eyes. After doing shoulderstands, the corpse pose is an excellent resting counterpose because it helps your entire body relax.
Paschimottanasana (Seated Forward Bend):
2. After performing Shavasana, sit on your yoga mat in staff pose with your upper body up. Maintain an erect posture, contract your core, and take a deep breath before progressively bending forward.
After touching your knees with your forehead, stretch your arms in front of both legs to relieve any tension in your upper body.
Balasana (Child Pose):
- Bend into a tabletop position on your yoga mat while continuing to go forward. Slowly recline on your shins and extend both arms in front of you.
After extended periods of Shoulderstand holds, this position will assist you in simultaneously relaxing your arms, lower back, shoulder blades, and spine.
Sarvangasana Variations to Consider
Whether you are a novice or an expert yoga practitioner, there are always exciting variants to explore your body’s potential. Here are various variants of Sarvangasana that you may try:
Shoulderstand Pose with Bent Legs:
- Whether you are a novice or an expert yoga practitioner, there are always exciting variants to explore your body’s potential. Here are various variants of Sarvangasana that you may try:
This will lessen the strain on your shoulders, neck, and chin, improving the lift’s stability and balance for a much longer period of time. Try lifting one leg at a time and straightening it to advance your practice to the ultimate aim if you feel strong enough.
Single-Legged Shoulderstand Pose with Hands-on Back:
2. This is for intermediate yogis who wish to maintain the Sarvangasana erect for extended periods of time.
Lift your back first, then bend both arms until they are exactly in the centre of your back. This variant helps maintain your balance for a longer period of time and serves as a support system for your core.
FAQS
What is Salamba Sarvangasana?
A contemporary inverted yoga pose, Salamba Sarvangasana is frequently done at the conclusion of an Ashtanga yoga practice. This yoga pose’s words are a blend of several Sanskrit terms, such as the following:
Salamba– Supported
Sarvang– All Limbs
Asana– Posture
Salamba Sarvangasana is also known as the Supported Shoulderstand Pose. This stance is excellent for mental renewal since it pumps blood to the brain.
What is the benefit of Sarvangasana?
Sarvangasana, a yoga stance that improves the body’s organ functioning, is also referred to as the “Mother of all Asanas” or the “Queen of Asanas.” Additionally, this position is very therapeutic since it improves the body’s flow of prana, regulates hormone imbalances, and relaxes the brain.
What are the steps of Setu Bandha Sarvangasana?
Setu Bandha Sarvangasana is a shoulder-supported bridge pose. As you balance in this position, your entire core is supported by the strength of your shoulders.
In order to prepare for Sarvangasana and Halasana, the shoulder-supported bridge position is also employed. Setu Bandha Sarvangasana involves the following steps:
Lie down on your back.
Breathe continuously and engage your core muscles.
Put both arms on your waist’s sides.
Both feet should be near your hips as you bend your legs.
Now raise your core from your feet, shoulders, and palms and take a breath.
For a few minutes or as long as you feel comfortable, hold this stance.
Release this pose by carefully putting your core back on the floor after exhaling.
How long should Sarvangasana be done?
The length of your Sarvangasana stance is determined by your level of practice. Depending on their comfort level, expert yogis can maintain this inverted position for three to five minutes, or even longer, while intermediate yogis can do it for thirty seconds to a minute.
Who should not practice Sarvangasana?
Sarvangasana should not be performed by anyone with high blood pressure, cardiac issues, slipped disks, spondylosis, shoulder, neck, sinus, migraine, or menstrual cramps.
What is the main pose of Sarvangasana?
Sarvangasana’s primary posture is an inverted vertical upright stance that is balanced on the shoulders, and occasionally even on the arms and shoulders.
Your neck is somewhat constricted, your chin is locked into your chest, and your legs can be shaped differently depending on how difficult you want this posture to be.
References
- Allen, W. (2025e, August 26). Sarvangasana. https://myyogateacher.com/yoga-asana/sarvangasana
- The Yoga Institute. (2022, July 4). Sarvangasana – The Shoulder Stand – The Yoga Institute. The Yoga Institute. https://theyogainstitute.org/sarvangasana-the-shoulder-stand
- Stephen. (2023a, March 31). How to do Sarvangasana – Benefits & Yoga Pose Tutorial. Adventure Yoga Online. https://adventureyogaonline.com/sarvangasana-benefits/
One Comment