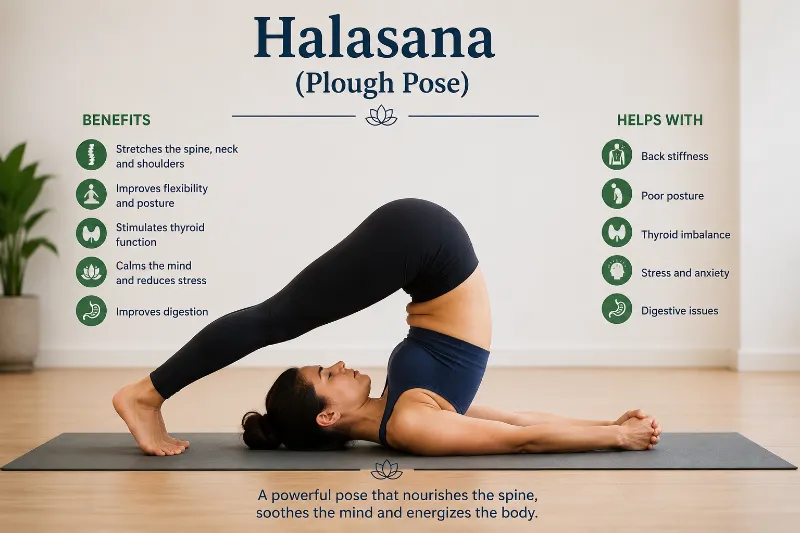
Halasana (Plough Pose)
What is Halasana (Plough Pose)?
Halasana (Plough Pose) is a traditional yoga posture that gently stretches the spine, shoulders, and hamstrings while promoting flexibility and relaxation.
In the same way that a plough is used to excavate soil and restore its fertility, Halasana (Plough Pose) guides the body and mind toward profound regeneration. This full-body stretch gives you new perspectives by flipping your body upside down and placing your feet over your head.
Halasana increases blood flow and spinal column flexibility by extending the lumbar, thoracic, and cervical regions of the spine. This position lengthens the spine and stretches the shoulders, which helps ease back discomfort. When performed properly, Halasana can assist in reducing tension in the back of the neck and throat.
Overview & Etymology
Overview
Halasana is derived from the Sanskrit words Hala, which means “plough,” and Asana, which means “posture,” or “seat.” The 19th-century Sritattvanidhi describes and illustrates Lāṇgalāsana, which also means plough position in Sanskrit.
- Sanskrit Name: हलासन
- Pronunciation: Hah-lahs-ah-nah
- Pose Type: Inversion
- Also known as: plough pose
- Strengthens: Spine, Neck, and Shoulders
- Stretches: Spine, Shoulder
Health Benefits of Halasana
Aids in weight loss.
- Aids in stress reduction.
- Provides back pain relief.
- Aids in diabetes management.
- Thyroid glands are stimulated well.
- Enhances digestive organs’ functions.
- Works as a natural treatment for leg cramps.
- Promotes blood circulation in the roots of all glands.
- Improves hair growth and reduces chronic hair fall.
- Females can feel relief from stress in trigger areas during Menopause.
When to Avoid Performing Halasana
Steer clear if you recently had surgery or an injury.
- Avoid during menstruation and pregnancy.
- Steer clear if you have problems with your liver, spleen, or thyroid.
- Steer clear if you have poor digestion, migraines, hypertension, or breathing problems.
What Kinds of Halasana Are There?
Halasana comes in a wide variety. A few are listed below:
- Ardha Halasana
- Ardh Padma Halasana
- Reclined Legs Raised Pose with bolster
- Plough Pose Hands-On Back/Halasana Hands On Back
- Ear Pressure Pose /Karnapidasana
- Easy Plough pose/Purva Halasana
- Legs raised with a strap
- Snail Pose
How to do Halasana (Plough Pose)
Usually, a plough pose is done near the conclusion of a yoga class. Therefore, there are four steps involved in beginning your Halasana practice.
Part 1 – Preparatory Poses for Halasana
This beautiful yoga stance puts additional strain on the shoulder and neck muscles; therefore, they need to be strong. Similar to ploughing a field, Halasana, or plough stance, calls for strength, as the name suggests.
So let’s concentrate on the yoga positions that help open the neck, shoulders, and back while also highlighting the significance of breathing.
Setubandha Sarvangasana (Bridge Pose)
- In Bridge Pose, the body creates an inclined bridge that improves and induces spinal flexibility. The strength needed to prime the shoulders and neck for Halasana comes from the weight of the body on these muscles. Here, breathing is also crucial because it helps maintain the stance for a long time.
Pavan Muktasana (Wind Release Pose)
2. Because it helps the body release any unnecessary gas, air, or wind in the low abdomen, this posture is considered the preparation pose before beginning Halasana. Tension is applied to the lower core muscles by raising the head and positioning it close to the knees while pushing both bent knees toward your chest.
In addition to opening the low back muscles, the tension in the lower abdomen facilitates better backflow in Halasana. The elevated head prepares the upper body for this inverted posture by opening the shoulder muscles and cervical spine. The body must go voluntarily and effectively into this wind release stance position in order to accomplish Halasana.
Half Halasana Variation (Half Plough Pose)
- The last stance for preparation is the Half Halasana stance. With the legs elevated straight up and the entire spine supported on the floor, one must concentrate the pressure on their legs, lower back, and full core muscles. You can hold this pose with controlled breathing for longer if your shoulders and abdominal muscles get stronger.
Part 2: Step-by-Step Instructions to Perform Halasana
- Step 1: Start by reclining on the ground with your arms relaxed and close to your body, your feet together. Take deep breaths to help your body relax as you stay here for a short while.
- Step 2: Bring your knees to your chest and then straighten your legs toward the ceiling.
- Step 3: Using your core strength and the support of both hands at your low or mid-back, raise your hips off the floor and roll up till your shoulders sustain you. Place your hips higher than your shoulders.
- Step 4: Lower your legs gradually above your head until your toes touch the floor behind you. Keep your toes on the floor and your feet flexed.
- Step 5: Clasp your hands behind your back or place your arms palms down on the ground. Press down with your shoulders and outside upper arms to increase lift along the spine. For at least five deep breaths, hold this stance.
- Step 6: Unclasp your hands, press your hands and arms into the mat, and roll down one vertebra at a moment to end this pose.
- Step 7: Just lie in the corpse stance for a short while to let the back revert to its natural curves and contours.
Breath Awareness:
Both the windpipe and the chest are blocked in Halasana, which may be uncomfortable to perform. It is essential to have a smooth flow of energy, which can be learned from a trained yoga instructor or by observing the breathing signals listed below:
- As you breathe, feel the air moving through your body by bringing your knees together and your arms close to your torso. Take a deep breath and lift your legs to a 90-degree angle.
- Gather your legs and use your wrists to support your low back while you inhale and exhale slowly. Then, place both of your legs behind your head and touch your toes to the ground. Breathe out fully and let your body unwind.
- Place both of your toes firmly on the floor at the back of your head and control your breathing.
- Take a few deep breaths, raise your legs and toes to support your low back, and then exhale while bending your knees.
- Take another deep breath and bring your low back, chest, and abdomen to the floor. Then, place your feet on the floor and relax your back. Restore your regular breathing rhythm while keeping your knees bent.
- Take another deep breath and bring your chest, low back, and core area to the floor. Then, lay your feet on the floor and bend your knees to relax your back. Here, start breathing normally again.
- Take a few deep breaths, hold them, and then gradually release them if your breathing is shallow and rapid. Continue doing this until breathing is regular and the entire body feels calm.
- Duration of Performance for Novices: For 20 to 60 seconds, hold the stance.
- Performance Duration for Advanced: Hold the pose for 2 to 5 minutes.
Part 3: Things to Keep in Mind
If you are just beginning to practice Halasana, be mindful of these safety cues.
Beginners should be familiar with the principles of inversions and know how to do them with proper body alignment before attempting Plough Pose. To do it safely, you’ll also need a certain bit of flexibility. If you have trouble with preparatory postures, you’re not ready for a plough pose.
If you have discomfort in your neck, think about utilising a prop. Plough Pose may put your neck in a precarious position (your cervical spine) if you place too much weight on top of your spinal column. By shifting your weight from your neck to your shoulders, using a blanket as a prop can help protect your neck.
Part 4: Relaxing Poses After Halasana
More damage happens when muscles are not permitted to contract before switching to the next pose or repeating the same stance. Being mindful of one’s body is essential during any yoga pose since it helps the body rest more swiftly and intelligently.
The shoulders and neck muscles need to release and relax after performing Halasana. A couple of positions need to be practised soon after Halasana to guarantee appropriate spine relaxation:
Supta Baddha Konasana (Reclining Bound Angle Pose):
- As you release the body from Halasana, bring the feet to the floor and position them in Namaste. Namaste’s feet will offer the comfort that the shoulders and lower back require. With your arms extended next to you and your feet at Namaste, take deep breaths and relax your entire spine.
Make sure your lower back is completely flat on the ground by attempting to bring your knees closer to the floor as you exhale. Because the blood flow in the feet, which was previously in the opposite direction, is now turned back to normal, this relaxing position is essential right after practising Halasana.
- In Savasana (Corpse Pose), relax your entire body while breathing steadily. Make sure your head, chest, and limbs are relaxed and close to the mat. By controlling your breathing, you can relax your whole body. Hold this posture for ten to twelve breaths in total.
Halasana Variations to Consider
One student may find a yoga posture easy, while another may find it difficult since various students have varied ability levels.
Therefore, these mild variations of the plough stance are appropriate for novices who are struggling to execute the primary pose:
Easy Halasana:
- Try bending your knees so they are just over your forehead rather than flexing and pointing your legs out in the inverted plough pose. If you are experiencing pressure-related muscular pain or soreness, this pose will help you establish a more comfortable position around your shoulders and back.
Plough Pose Hands-On Back:
- With the exception of the support from your hands on your back, this variation is 90% identical to the ultimate plough posture. For more even, solid, and soothing back support, think about putting your hands on your back if you find it unpleasant to stretch your back in Halasana.
FAQs
What are the benefits of Halasana?
Halasana stretches your spine and tones and develops your back muscles. This stance helps prevent and relieve stress in the neck, shoulders, and back, which will assist your arms, legs, and shoulders. Additionally, Halasana increases flexibility throughout the body, which enhances muscle and joint mobility.
When should the Halasana pose be avoided?
Women who are pregnant or on their period should avoid doing Halasana. This yoga pose puts a lot of tension on the lower abdomen; therefore, anyone with enlarged thyroids, spleens, or livers should avoid it.
If you have weak or damaged neck muscles, or if your legs, hamstrings, or calf muscles are weak, stay out of this pose.
How do you perform Ardha Halasana?
The steps to execute the half-plough position, or Ardha Halasana, are as follows:
Take a breath, then slowly bring your legs together until they are vertical to the floor without bending your knees.
The body should remain straight from the hip to the shoulder.
For five to ten breaths, hold the final pose with body awareness.
Breathe out and slowly bring your legs down to the floor while maintaining a calm head.
You can repeat this three to five times if you’d like.
Note: You should not perform Ardha Halasana if you have lumbosacral (lower back) pain, a hernia, or an abdominal injury.
Does the Halasana yoga pose reduce belly fat?
Indeed, it helps burn fat, especially in the abdomen. Halasana is great for maintaining toned abdominal muscles since it puts more tension on the abdominal region; with consistent practice, it also helps eliminate belly fat.
What are the different Halasana variations?
One can incorporate several Halasana variations into their daily practice of inversions, such as Karnapidasana, Ardha Halasana, Purva Halasana, Plough Pose Hands On Back, and Supta Paschimottanasana.
Is Halasana for beginners?
Beginners should exercise caution when doing Plough Pose because many people think it’s a difficult pose. Consider establishing solid foundations with similar preparatory positions if you wish to execute Plough Pose.
References
- Allen, W. (2025c, August 26). Halasana. https://myyogateacher.com/yoga-asana/halasana
- Yoga Journal. (2025z, March 24). Plough pose. https://www.yogajournal.com/poses/plow-pose/
- Nitesh Patel – Physiotherapist. (2024). Halasana: Health Benefits, Steps, Types, and How to do? – Mobile Physio.. Mobile Physiotherapy Clinic. https://mobilephysiotherapyclinic.in/halasana-yoga-pose-steps-how-to-do/
- Panigrahi, G. V. (2026, August 13). Halasana (Plough Pose): Benefits, Steps & Safe Setup. Vinyasa Yoga Academy Blogs. https://vinyasayogaacademy.com/blog/halasana/


3 Comments