Parshvottanasana (Pyramid Pose)
What is Parshvottanasana (Intense Side Stretch Pose)?
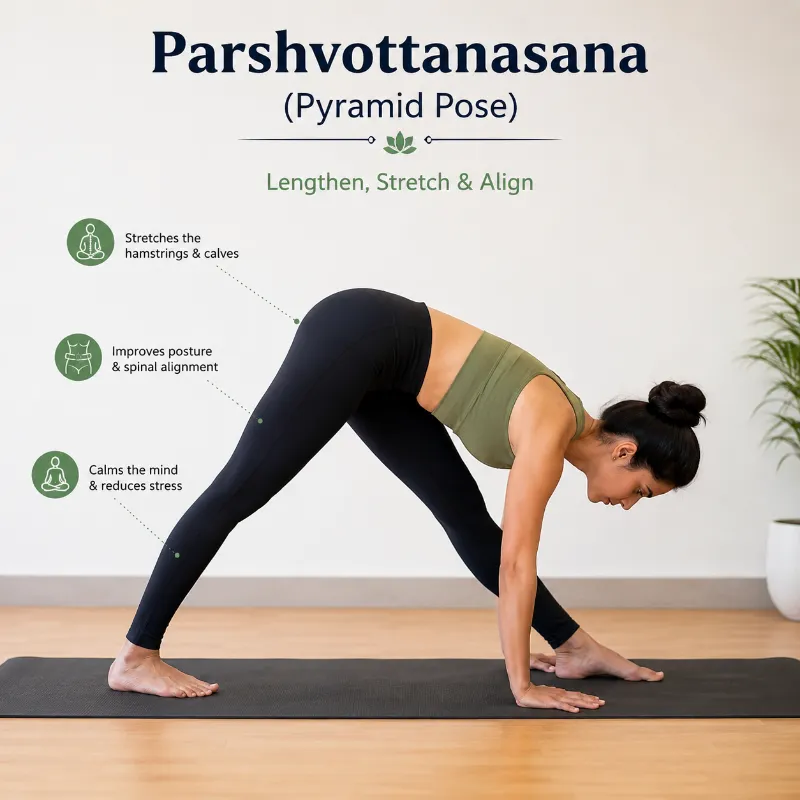
Parshvottanasana, also known as Pyramid Pose, is a standing yoga posture that combines balance, strength, and deep stretching. It primarily stretches the hamstrings, calves, and hips while helping improve posture, stability, and body awareness.
Extending both arms behind your back and gently bending your upper body toward one knee on one side of the five-point star posture will stretch your spine. Repeat on the other side.
The best thing about this pose is that everyone can benefit from practising it because it’s beginner-friendly. Additionally, you’ll feel more at ease, flexible, and reenergized the longer you maintain this posture.
Muscles Worked
- Primary: Hamstrings, calves, quadriceps, glutes
- Also engaged: Core, back, shoulders, and hip muscles
Overview & Etymology
The Sanskrit terms “Parshva” (side), “Ot” or “Ut” (intense), “Tan” (to extend), and “Asana” (posture) are the sources of Parshvottanasana.
Since none of the old yoga scriptures describe the extreme side stretch stance, it is a modern yoga practice.
Parshvottanasana was initially introduced to the Indian yoga system in 1935 by Krishnamacharya in his book “Yoga Makaranda.” This posture became a staple of the Ashtanga primary sequence, Hatha yoga, and Iyengar yoga worldwide after his pupils, Pattabhi Jois and B. K. S. Iyengar, began teaching it in their yoga schools.
- Sanskrit Name: पार्श्वोत्तानासना
- Pronunciation: Parsh-voh-tahn-AHS-anna
- Pose Type: Standing Forward Bend
- Also referred to as: Pyramid Pose or Intense Side Stretch Pose
- Strengthens: Legs, Ankles, Obliques, & Spine
- Stretches: Hamstrings, Glutes, Obliques, Shoulders, Spine, and Neck
Health Benefits of Parshvottanasana
Physical Benefits of Parshvottanasana
Improves Hamstring Flexibility
Parshvottanasana provides a deep but controlled stretch to the hamstrings, which may help improve flexibility over time.
- Strengthens the Legs: The pose engages the quadriceps, hamstrings, calves, and gluteal muscles, helping support lower-body strength and stability.
- Supports Hip Mobility: The posture encourages controlled movement and alignment around the hips, which may support overall hip mobility.
- Improves Balance and Stability: Maintaining a steady standing position requires coordination between the legs, hips, and core.
- Encourages Better Posture: Keeping the spine lengthened during the forward fold can improve awareness of proper body alignment.
- Stretches the Calves: The position of the legs provides a gentle-to-moderate stretch through the calf muscles.
- Engages the Core: The abdominal muscles work to help maintain stability and control while performing the pose.
Mental Benefits of Parshvottanasana
- Promotes Mental Focus: Maintaining balance and alignment requires concentration, helping bring attention to the present moment.
- Encourages Relaxation: Slow, controlled breathing during the pose can help create a more relaxed yoga practice.
- Supports Stress Management: Combining mindful breathing with steady movement may help reduce feelings of everyday stress.
- Improves Body Awareness: The pose encourages practitioners to notice their posture, balance, breathing, and muscle engagement.
- Builds Patience: Developing flexibility and stability takes consistent practice, which can encourage patience and mindfulness.
When to Avoid Performing Parshvottanasana
- Avoid during pregnancy.
- Avoid if you have knee arthritis.
- Avoid if you have a migraine or vertigo.
- Avoid if you’ve recently had any surgery.
- Avoid if you have scoliosis or kyphosis.
- Stay away if you have lumbar spondylitis or a herniated disk.
- If you have any significant injuries or body pain right now, stay away.
How to do Parshvottanasana (Intense Side Stretch Pose)
Warm-up, steps, posture cues, and calming pose are the four primary phases of Parshvottanasana, or pyramid pose.
Part 1 – Preparatory Poses for Parshvottanasana
The lower back, hamstrings, and spine should all have their blood circulation activated. Before attempting pyramid posture, begin with these warm-up poses:
Tadasana (Mountain Pose)
- It aids in creating a solid base for all standing yoga positions. To begin, place your feet two inches apart in the middle of the mat. Maintain a straight back and look straight ahead.
Inhale deeply, raise your arms to your chest, and interlock your fingers. As you raise your arms aloft, take a breath. After a few seconds of holding this pose, release your breath and relax your limbs to a neutral standing position.
Your legs, arms, shoulders, and spine can all be gently activated with this pose.
Adho Mukha Svanasana (Downward-Facing Dog Pose)
- Maintain your palms and feet planted into the yoga mat as you begin to raise your glutes toward the ceiling from a tabletop position. Maintain a tight core to stabilise in this position.
Your shoulders, back, hamstrings, and calves will become activated after holding the pose for one to two minutes. Your spine will become more mobile, and your core balance will improve as a result.
Prasarita Padottanasana (Intense Leg Stretch Pose)
- To begin, place your legs wider than hip-width apart. Breathe in and raise your arms above your head, then release the breath as you lean forward until your fingers can grasp your big toes.
For a few minutes, maintain this stance. You may work your hamstrings, lower back, and inner legs with this wide-stance forward fold. Additionally, it promotes the simultaneous renewal of the brain, shoulders, and neck.
Part 2: Step-by-Step Instructions to Parshvottanasana
To perform an extreme side stretch stance, also known as Pyramid Pose, follow these steps:
- Step 1: Take Mountain Pose while standing in the middle of your mat.
- Step 2: Stand with your hands in Anjali Mudra (Namaste) and your spine straight. Close your eyes and concentrate on your breathing.
- Step 3: Step one foot halfway back on your mat after forming a triangle with your legs.
- Step 4: Maintain the same sideways direction with both feet. Breathe in while raising both arms aloft.
- Step 5: For Pyramid position, breathe while you reach down and fold your upper body forward.
- Step 6: Place your fingertips on your front foot’s sides.
- Step 7: Close your eyes to relax your neck while keeping your chest in line with your front thigh.
- Step 8: It’s important to keep both knees softly bent as you hold the pose.
- Step 9: Lastly, return to Mountain position to end the pose, take a few moments to relax, and then repeat on the other side.
Breath Awareness:
Inhale: Raise both arms above your head while in mountain posture.
Breathe out as you fold your body forward into a side stretch.
- Beginners should perform Parshvottanasana for 60 to 90 seconds on each side.
- Advanced Performance Time: Hold Parshvottanasana for two to five minutes on each side.
Part 3: Things to Keep in Mind
Before you begin your practice, keep the following alignment advice in mind to make sure your legs are safe.
- Measure the separation between your legs: The stance can be dangerous and useless if your legs are positioned too close or too far apart. Make sure your legs are somewhat broader than your hips.
- Avoid overstretching: If your leg muscles are not sufficiently flexible, you risk overstretching your hamstrings. This can lead to a hamstring tear or low back pain. Thus, prior to the primary practice, be sure to warm up your back and legs.
- Avoid locking your knee joints: If you lock your knee joints, your legs will become so straight that the area surrounding your knees becomes painful. This may result in serious knee joint deterioration and discomfort. When you extend onto your side, try to keep your knees slightly bent.
- Keep an eye out for your hands: When performing the Parshvottanasana, avoid placing your palms on your shins, as this could put undue strain on your legs and damage your knee joints.
Part 4: Relaxing Poses After Parshvottanasana
Following your rigorous side stretch posture practice, try these counter-poses:
Counter Spine Flexion:
- Following a vigorous side stretch, elevate your upper body, arch your spine in the other direction, look up at the ceiling, and adopt a reverse prayer position with your arms behind you.
To restore the natural shape of your spine, hold this counter posture on each side for 30 to 90 seconds.
Uttanasana (Standing Forward Bend):
- Straighten your spine by returning to Mountain pose. Now, breathe in and raise your arms overhead. Breathe out as you begin to bend forward, keeping your knees slightly bent and fully pressing your shoulders, neck, and back toward your chest. Spend a few minutes relaxing in this pose.
Parshvottanasana Variations to Consider
Consider the following alternatives to enhance or change your Pyramid position practice:
Ardha Parsvottanasana (Half Intense Side Stretch Pose)
- This version includes minimising your forward-bending motion, as the name implies. Point both of your feet in the same direction to begin.
To make your upper body parallel to the ground, gently begin to hinge your torso, but just halfway through. You can use your arms in reverse prayer formation to further test your body’s equilibrium.
Intense Side Stretch Pose with Reverse Flexed Arms
- Take a deep breath, then stand with both feet pointing in the same direction and your legs spread wide. Keep your posture straight while interlocking your fingers behind your back.
As you release the breath, flex your arms straight behind you and bend your upper body forward. Locking your fingers will promote shoulder mobility and test the range of motion in your shoulders. For yogis at an intermediate to advanced level, this version is ideal.
Common Mistakes in Parshvottanasana
- Rounding the back while bending forward
- Turning the hips instead of keeping them aligned
- Locking the knees too strongly
- Placing too much pressure on the front leg
- Forcing the chest toward the thigh
- Holding the breath during the pose
- Taking a stance that is too wide or too narrow
Tips for Better Practice
- Keep your spine long as you fold forward.
- Focus on moving from the hips rather than the waist.
- Keep both legs active throughout the pose.
- Maintain steady, relaxed breathing.
- Move slowly and avoid forcing the stretch.
- Use yoga blocks if your hands cannot comfortably reach the floor.
Beginner Tips
Beginners can start with a shorter hold and a comfortable leg position. Keeping the hands on yoga blocks can make the pose easier while maintaining proper alignment. Gradually increase the depth of the forward fold as flexibility improves.
Precautions for Parshvottanasana (Pyramid Pose)
- Avoid this pose if you have a recent hamstring, knee, hip, or lower-back injury.
- Avoid trying to touch your head to your knee or forcing the forward bend.
- Keep the front knee soft if locking it causes discomfort.
- Maintain proper alignment of the feet, knees, and hips.
- Use yoga blocks for support if your hands cannot comfortably reach the floor.
- Avoid twisting the hips excessively while folding forward.
- Keep your movements slow and controlled.
- Stop immediately if you experience sharp pain, dizziness, or unusual discomfort.
- Beginners should practice under the guidance of a qualified yoga instructor if they are unsure about proper alignment.
- People with balance difficulties can practice near a wall for additional support.
Preparatory Poses
Before practising Pyramid Pose, gentle warm-up poses can prepare the hips, legs, and hamstrings. Useful options include:
- Tadasana (Mountain Pose)
- Adho Mukha Svanasana (Downward-Facing Dog)
- Uttanasana (Standing Forward Bend)
- Anjaneyasana (Low Lunge)
- Ardha Hanumanasana (Half Splits)
FAQs
Can beginners perform Parshvottanasana?
Yes, beginners can perform Parshvottanasana. However, it’s a strong side stretch, so to prevent injuries, warm up with some simple yoga poses before beginning your Parshvottanasana practice.
What are the different stretches in Parshvottanasana?
Parshvottanasana stretches the obliques, low back, shoulders, hamstrings, inner thighs, and spine.
What are the benefits of Parshvottanasana?
The following are a few benefits of Parshvottanasana:
Lengthens your spine.
Reduces back pain.
Stretches the side body.
Burns fat from your inner thighs.
Strengthens your legs, knees, and ankles.
Activates your digestive system and your reproductive system.
What are the different variations in Parshvottanasana?
Arms-behind-in-Anjali-mudra and reverse-flexed-arms-at-the-back are two modifications of Parshvottanasana. These variants will increase your strength and flexibility by testing the intensity of your side stretch stance.
References:
- Allen, W. (2025k, August 26). Parshvottanasana. https://myyogateacher.com/yoga-asana/parshvottanasana
- Yoga Journal. (2025a, March 24). Pyramid Pose | Intense side stretch pose. https://www.yogajournal.com/poses/intense-side-stretch-pose/
- Stephen. (2023a, March 31). How to do parsvottanasana — benefits and pose breakdown. Adventure Yoga Online. https://adventureyogaonline.com/parsvottanasana/