Parighasana (Gate Pose)
What is Parighasana (Gate Pose)?
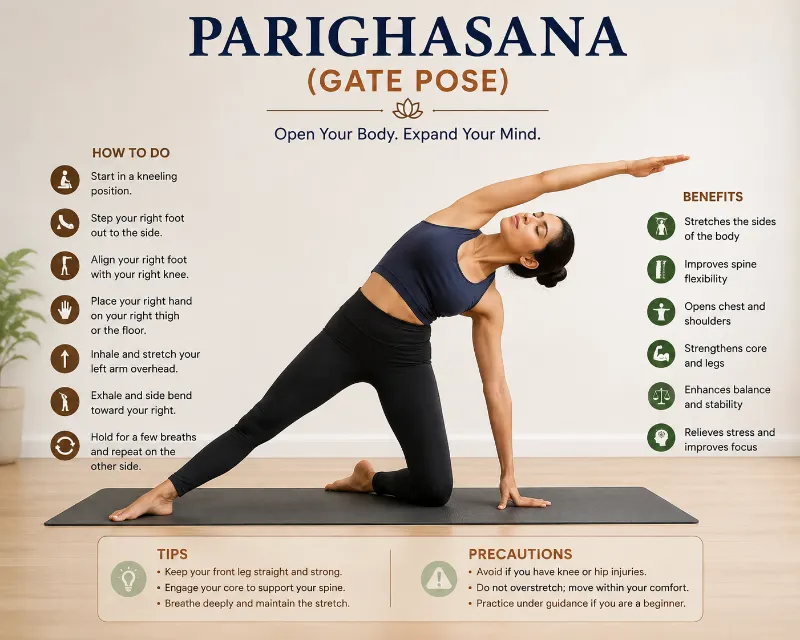
A kneeling stretch that works the side muscles of the abdomen is called Parighasana, or Gate Pose. It’s a yoga pose for beginners to intermediates.
In this pose, one leg must be straightened sideways while kneeling on the mat. Your obliques will feel deeply stretched as the arms are extended to the side.
For people who want to sculpt their obliques or reduce side abdominal fat, gate position is a great option.
Overview & Etymology
The word Parighasana comes from the Sanskrit language, which translates as ‘Parigha’ meaning gate closing bar and ‘Asana’ meaning position or posture.
There is no ancient Hatha yoga literature that mentions the gate pose because it is a modern yoga practice.
The Parighasana is one of the numerous contemporary yoga poses found in Niels Bukh’s 1924 book Primary Gymnastics.
The gate stance is reported to have originated in gymnastic practice and been included in the teaching culture of Sri Tirumalai Krishnamacharya, an Indian yoga teacher and healer.
- Sanskrit Name: परिघासन
- Pronunciation: Par-ee-GHA-AH-suh-nuh
- Pose Type: Kneeling Side Stretch.
- Also known as Gate Pose
- Strengthens: Obliques, Hip-Flexors, Spinal Column, and Knees
- Stretches for the chest, hamstrings, inner thighs, obliques, spine, groin, and intercostal muscles
Health Benefits of Parighasana
- Strengthens and tones the obliques.
- Lengthens and strengthens the spine.
- Improves spinal range of motion and posture.
- Expands the lungs and stretches the intercostal muscles
- Stimulates the digestive system and enhances its functioning.
- Enhances the body’s energy flow and activates the heart chakra.
- Has a beneficial impact on inflammatory bowel disease and minor back discomfort.
When to Avoid Performing Parighasana
- Avoid if you are suffering from a hernia.
- Avoid if you have chronic low back pain.
- Steer clear if you recently had surgery or an injury.
- Steer clear if you have knee arthritis or weak knees.
- Avoid after the second trimester of pregnancy.
How to do Parighasana (Gate Pose)
Warm-up poses, primary posture practice, alignment advice, and relaxation poses are the four stages of the Gate Pose practice:
Part 1 – Preparatory Poses for Parighasana
Here are several yoga positions that will help you engage key muscle groups, including your hamstrings, knees, hip flexors, obliques, and spine. For the primary Gate posture exercise, warming up these muscle groups promotes flexibility and range of motion:
Virabhadrasana II (Warrior Pose II)
- You can strengthen your knees and quadriceps and enhance side body balance with this pose. Step your feet three to four feet apart while in the Tadasana pose.
With your palms facing the ground, raise your arms to shoulder height at your sides. To align your heel with your left foot’s arch, turn your right foot out 90 degrees.
Then, turn your left foot 45 degrees. With your thigh parallel to the floor, bend your right knee over your right ankle. Make sure your left leg is straight behind you and that your knee is positioned above your ankle. Gaze over your right hand. After holding the stance for five to ten breaths, switch to your other leg.
Parivrtta Janu Sirsasana (Revolved Head to Knee Pose)
- To begin, sit with your toes pointing up toward the ceiling in the wide-angle sat position. Maintain your right leg straight at your side while bending your left leg and bringing your foot near your groin.
Now stretch your left arm overhead, bend your body sideways onto your right leg, and gently turn your tailbone to the right. For a few seconds, hold your right toe in place with your left hand.
Repeat the same on the other side. Your side body, pelvis, hip flexors, and hamstrings are all deeply stretched by this sitting hip opener.
- It is not required to complete this pose because it is an intermediate-level back stretch. Place your knees hip-width apart and begin on your knees. Pull your tailbone near to your navel, arch your back, and tighten your core.
Place your arms behind you, gently bend your neck back, and grasp both ankles with your fingers. Hold this position for a few seconds. Your lower back, spine, quadriceps, neck, and core will all be activated by this pose.
Part 2: Step-by-Step Instructions to Parighasana
To execute Parighasana, also known as Gate Pose, follow these steps:
- Step 1: Kneel on the yoga mat with your toes curled behind you to begin.
- Step 2: Next, spin your right knee and right toe toward the ceiling while extending your right leg to your right side. On your left leg, continue to kneel.
- Step 3: Take a deep breath and elevate your left arm above your head. Reach for your left ear while maintaining this stance for a few seconds.
- Step 4: Now look up at your left arm, release your breath, and bend your upper body in the direction of your right leg.
- Step 5: Only bend as much as it feels good for your body. For extra support, you can place your right hand on the yoga mat.
- Step 6: Relax and hold this pose on either side for a short while.
- Inhalation: As you raise one arm above your head while kneeling on the mat.
- Breathe out while bending your upper body in a sideways motion.
- Beginners’ Performance Duration: Hold Parighasana for five to ten deep breaths on each side.
- Advanced Performance Time: Hold Parighasana for one to five minutes on each side.
Part 3: Things to Keep in Mind
To enhance the benefits and safety of your Gate posture practice, pay attention to these crucial alignment cues:
- Maintain a straight back: During the Gate posture, be sure to maintain an upright spine that aligns with your neck and glutes. You will not be able to properly open your chest or stretch your spine if you slump your shoulders or curve your spine.
- Avoid overstretching because it might seriously deteriorate your muscles. Take note of how your oblique muscles feel as you bend your upper body on both sides. Avoid overstretching if it hurts too much to lean to your side. Instead, try modifying the pose with your yoga instructor’s portable support or props.
- Avoid lowering your upper body: When they flex sideways, most novices make the error of bending their upper body forward. The improper muscle groups can be targeted by even a small forward bend. It can also result in lower back pain and won’t help you tone or develop your side abs. Keep your torso bent at the side rather than the front as you bend sideways, and look up in the direction of your outstretched arm.
Part 4: Relaxing Poses After Parighasana
After performing Gate pose, it’s crucial to relax your obliques and release any tension that has accumulated around your knees and spine. Try the following counter poses:
- Now that you are kneeling, put your hands on the ground and assume the tabletop posture. As you bring your glutes to sit between your thighs and your forehead rests on the mat, inhale into the tabletop pose and slowly release the breath.
Take a few deep breaths, relax your shoulders, glutes, back, and abdomen, and keep your arms extended forward. Hold this position until your back feels at ease and relaxed.
Shavasana (Corpse Pose)
- Enter the corpse pose to release this pose as well as any residual tension from the upper body, tailbone, knees, and quadriceps. Close your eyes, lie down on your yoga mat with your back to the ceiling, and feel your breath moving through your entire body.
To help you relax your entire body at once, hold this semi-sleep stance for five to ten minutes. It will also assist you in returning your spine to its neutral posture.
Key Principles
Make sure your mat is on a level, stable surface before striking gate stance. Fold the mat double or place a folded blanket beneath the kneeling knee if your knees are sensitive. Never force a side bend; instead, move slowly and in time with your breath. The goal is length and space, not depth.
Parighasana Variations to Consider
You can improve your practice of the Gate pose in a variety of ways. Here are some of the most popular:
Parighasana Variation (Gate Pose Resting Arm Variation)
- It is strongly advised to maintain your upper arm pointed straight up and the other arm resting on the ground if you are beginning Gate pose as a beginner and lack the strength to bend laterally.
Beginners can open their side bodies with this version without straining their muscles too much. Additionally, practising this adjustment on a daily basis will help you improve the balance and strength of your main position.
Parighasana Variation (Gate Pose Deep Variation)
- You can gradually extend your side bending even further if your basic Gate posture practice makes you feel strong and solid.
Continue in the Gate pose, raise both arms in prayer form overhead, and begin to hinge sideways for this variant. Hold this stance for a few seconds on each side while resting your upper body over your extended leg at your side.
Common Mistakes to Avoid in Parighasana
- Collapsing Into the Bend Rather Than Lengthening First
Rushing into the side bend without first developing spinal length is the most frequent mistake. In order to protect the lumbar vertebrae and make sure the stretch lands in the side body rather than compressing the lower back, always take a tall breath before exhaling into the curve.
2. Letting the Hips Drift Backwards
The hips frequently move back away from the extended leg as the bend deepens, reducing the stretch and straining the kneeling knee. Throughout, maintain the kneeling hip exactly over the knee; if it drifts, actively push it forward.
3. Hyperextending the Knee of the Extended Leg
Your natural reaction is to violently lock out the extended leg if your hamstrings are tense. Instead, to protect the joint, keep the knee of the extended leg slightly micro-bent. Without pinching the back of your knee, you will still get a full hamstring stretch.
4. Dropping the Top Shoulder Forward
Instead of falling forward toward the ground, the above arm should reach exactly in line with the ear. Your shoulder rolling forward indicates a constriction of the chest. As you sweep your arm in a true lateral plane, concentrate on turning your upper chest toward the ceiling.
5. Gripping or Sinking the Kneeling Hip
Unconsciously clenching the kneeling leg’s glute causes the pelvis to tilt and the sacrum to compress. Maintain a neutral pelvis and a soft kneeling buttock to allow the spine to freely curve into the lateral bend.
6. Holding the Breath
Breathe openly and expansively in gate posture, especially onto the side of the ribs that are extended. Consider holding your breath or inhaling shallowly as an indication that you have gone too deep. Back off a few degrees till you can breathe freely once more.
FAQs
What is Parighasana Ashtanga?
A kneeling side stretch that works your obliques, spine, neck, tailbone, shoulders, and knees is called Parighasana Ashtanga, or Gate Pose. Over time, mastering this stance will help you tone and strengthen each of the aforementioned regions.
What is the meaning of Parighasana?
The Sanskrit words “Parigha,” which means crossbar (the bar used to close the gate), and “Asana,” which means pose, are combined to form Parighasana.
Can beginners perform Parighasana?
Parighasana should not be practised with low-side abdominal flexibility. Although this posture might not be the best option for novices, they can begin with modified Gate pose modifications to increase their obliques’ strength and mobility before gradually transitioning to the primary practice.
What should we perform before Parighasana?
Before beginning Parighasana practice, it is a good idea to warm up your legs, knees, spine, abs, and obliques in Warrior Pose II, Revolved Head to Knee Pose, and Camel Pose. This will guarantee that you don’t hurt yourself while practising the primary stance.
What are the different types of variations in Parighasana?
Some popular versions of Parighasana are Gate Pose with a Resting Arm on the yoga mat for beginners and Gate Pose with a Deep Side Bend for experienced practitioners.
What are the benefits of Parighasana?
The following are some benefits of Parighasana:
Tones the side waist.
Reduces low back pain.
Increases flow of Prana.
Mobilises the knee joints
Stretches intercostal muscles.
Lengthens the body sideways.
Increases strength and flexibility in the obliques.
Stretches the abductors, quads, and hip flexors.
References
- Allen, W. (2025i, August 26). Parighasana. https://myyogateacher.com/yoga-asana/parighasana
- Yoga Journal. (2026c, May 5). Gate pose. https://www.yogajournal.com/poses/library/gate-pose-2/
- Zehra, S. (2026a, August 7). Parighasana (Gate Pose): Steps, Benefits & Precautions. Habuild Blogs. https://habuild.in/habitology/asana-mudra/parighasana-benefits/