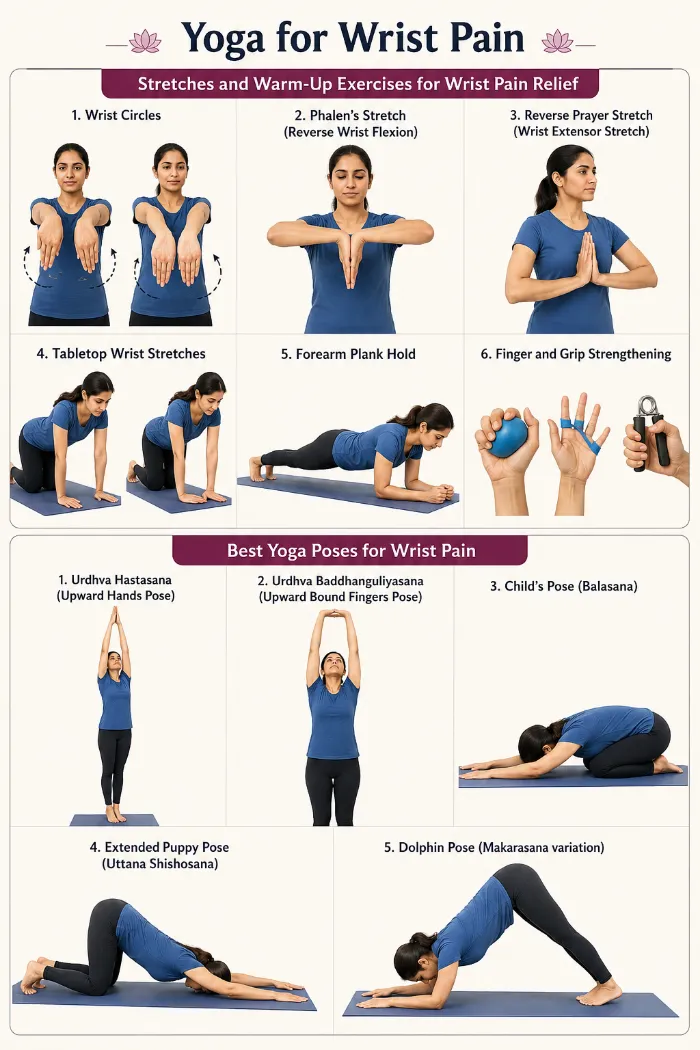
5 Best Yoga Poses for Wrist Pain
Introduction
One of the most prevalent complaints among yoga practitioners is wrist pain, especially for those who practice vinyasa, power yoga, or any other form that requires a lot of hand weight-bearing. Postures that put a lot of strain on the wrists, such as arm balances, downward-facing dog, plank, and chaturanga, can eventually cause discomfort, strain, or even damage for many. Our targeted guide to yoga for carpal tunnel syndrome may also be helpful if you experience tingling or numbness in your fingers as part of your wrist symptoms.
The good news is that you can continue practicing yoga even if you have wrist pain. You can protect your wrists, reduce current pain, and continue to reap the full benefits of yoga with the correct mix of stretches, strengthening exercises, and wise adjustments. This handbook includes all the information you require.
Why Do Wrists Hurt During Yoga?
The first step in effectively treating wrist pain is comprehending its causes. Wrist pain during yoga practice is caused by several factors.
Eight small carpal bones, several ligaments, and a network of tendons make up the intricate structure of the wrist joint, which offers an amazing range of motion. However, the wrist was not meant to support heavy loads when bent backward for extended periods of time, which is exactly what many yoga poses call for.
Your wrists are extended to about 90 degrees while bearing a sizable portion of your body weight when you place your palms flat on the mat in plank or downward dog. This can quickly become unpleasant for practitioners who have weak forearm muscles, restricted wrist mobility, or pre-existing illnesses like carpal tunnel syndrome.
Another common cause is incorrect hand placement. The pressure on the wrist joint increases significantly when weight is concentrated on the heel of the hand rather than spread throughout the entire palm and fingers. Similarly, letting the fingers passively rest on the mat rather than actively gripping results in an uneven load distribution.
Stretches and Warm-Up Exercises for Wrist Pain Relief
These positions and exercises can improve flexibility, release tension, and strengthen the muscles that support the wrist. When your wrists require care, use them as a stand-alone routine or as a warm-up before your usual yoga class.
Wrist Circles

- One of the best methods for warming up the wrist joint and improving synovial fluid circulation is this easy mobility exercise.
- Make soft fists while extending your arms in front of you.
- Ten times in each direction, slowly turn your wrists in circles.
- Make sure your motions are controlled and fluid.
- Spend a few more rotations in any areas that are sticky or constricted.
Phalen’s Stretch (Reverse Wrist Flexion)
- With your fingers pointed downward, press the backs of your palms together in front of your chest.
- Maintain contact between the backs of your hands; gently lower them toward your waist.
- Hold for thirty seconds.
- Because it gradually relieves pressure on the carpal tunnel area, this stretch is very helpful for people who have tingling or numbness in their wrists.
Reverse Prayer Stretch (Wrist Extensor Stretch)
- With your fingers pointed downward, place the backs of your hands together.
- Lift the hands to chest height by gently pressing them together.
- The extensor muscles at the top of the forearm are stretched as a result.
- For 20 to 30 seconds, hold.
- If this is too difficult, you can stretch one hand at a time by using the other hand to gently draw one hand’s fingers back.
Tabletop Wrist Stretches
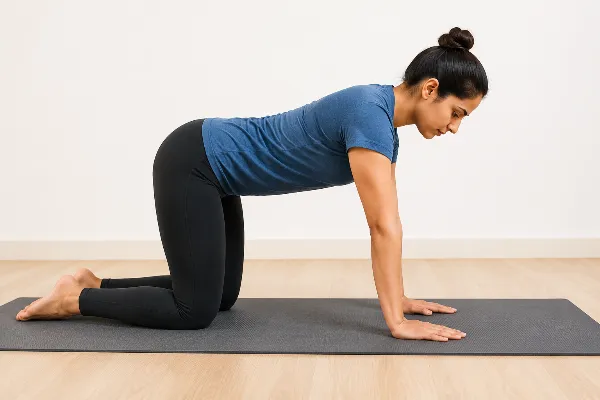
- On your hands and knees, reach the tabletop posture.
- To test your wrist range of motion, gently rock it forward and back while pointing your fingers forward.
- The front of your wrists can then be stretched by gently leaning back and turning your hands so that your fingers point toward your knees.
- Lastly, for a deeper extensor stretch, gently lean back while placing the backs of your hands on the mat with your fingers facing you.
- Hold each variation for 15 to 20 seconds.
Forearm Plank Hold

- Strong forearms reduce the stress on the wrist joint during weight-bearing poses.
- This strengthening exercise builds the shoulder and forearm muscles that support healthy wrist function without directly loading the wrists.
- Take a plank position on your forearms, with elbows directly under shoulders and forearms parallel.
- Engage your core, glutes, and quadriceps to maintain a straight line from head to heels.
- Hold for 20 to 30 seconds, gradually increasing to 60 seconds.
Finger and Grip Strengthening

- Make a tight fist and hold it for five seconds after spreading your fingers as wide as you can.
- Repeat ten times. Your ability to transmit weight evenly across the palm and fingers during weight-bearing poses can be improved by this exercise, which also strengthens the intrinsic muscles of the hand.
- For more resistance, you can also utilize a grip strengthener or stress ball.
Best yoga poses for wrist pain
Urdhva Hastasana (Upward Hands Pose)
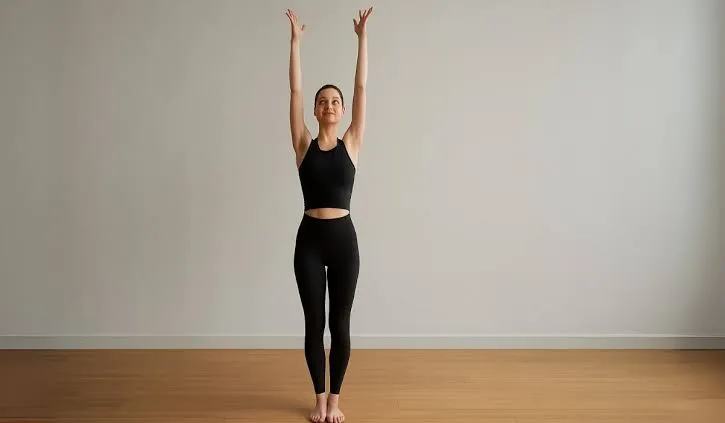
- In Tadasana, place your back against a wall.
- Place your feet a few inches away from the wall, hip-width apart and parallel to one another.
- To avoid arching your lower back, shift your weight back into the heels of your feet and extend your buttocks down the wall.
- Open your chest and raise the front and sides of your body.
- Feel your chest expand as you roll the farthest edges of your shoulders back into the wall.
- Stretch your arms straight out in front of you, palms facing each other, parallel to the floor.
- Bring your shoulder blades down your back by pulling your shoulders back into the wall.
- Next, raise your arms upward. Depending on your shoulder range of motion, your hands may or may not reach the wall.
- Release your shoulders and shoulder blades down the wall as you extend your arms straight and firmly toward the ceiling.
- Without shifting your waist, thighs, or lower back away from the wall, raise your side ribs toward your hands.
- Focus on the rotation of the shoulders and upper arms as you repeat the position, raising the arms from the sides this time.
- With your palms facing down, extend your arms straight out to the sides in alignment with your shoulders.
- Feel the biceps stretching toward your wrists as you extend the inner edges of your arms from the middle of your chest.
- Raise the sides of your chest, turn your palms to face the ceiling, and extend your upper arms from your shoulders.
- Your shoulder blades should seem to be the source of this rotation as they go down, in, and forward toward your chest.
- As you roll your biceps back toward the wall and your triceps forward away from it, raise your arms overhead.
- Raise the outer borders of your armpits toward your fingers and release the trapezius muscles away from your ears without lowering your arms.
- Breathe out and perform tadasana by lowering your arms to your sides.
Urdhva Baddhanguliyasana (Upward Bound Fingers Pose)
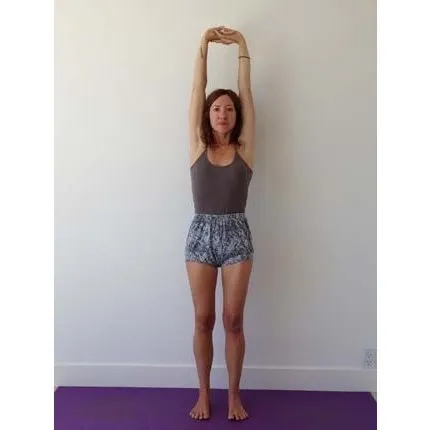
- We’ll concentrate on how to stretch the arms without contracting the trapezius muscles in the first variation of this pose.
- After performing tadasana, place the backs of your hands on top of your head, palms facing up, and firmly interlock your fingers at the webbing.
- As you start to extend your arms toward the sky, release the tops of your trapezius muscles down your back and away from your neck.
- When the trapezius muscles start to tighten, even if it’s just on one side, stop and let them relax before moving on.
- Try using your triceps to support the upper arm bones rather than tightening your shoulders to straighten your arms.
- Breathe out, open your hands, and let your arms drop to your sides.
- Now repeat the position with a focus on lengthening the fingers and wrists and opening the sides of the chest.
- Your fingers should be arranged so that the opposing index finger is on top.
- Stretch your arms straight out in front of you, parallel to the floor, slowly, bringing the backs of your clasped hands to your chest.
- Extend the hands’ heels and push out through the bases of the fingers.
- Straighten your arms until you feel the inner arms stretch after making the outer arms firm.
- Raise your arms above your head while keeping them perfectly straight.
- Raise the sides of your rib cage and open your arms, spreading and elevating them toward your hands as you raise your wrists toward the ceiling.
- Try spreading your palms wide and moving your hands farther back until your arms are next to or even behind your ears. Move your shoulders and upper back toward your chest as you extend your arms farther back, being careful not to press your lower back and lower ribs forward. Release your trapezius muscles while keeping your arms stiff and straight, without lowering your palms. Breathe out, release your hands, and return to tadasana by bringing your arms forward and down by your sides.
Child’s Pose (Balasana)
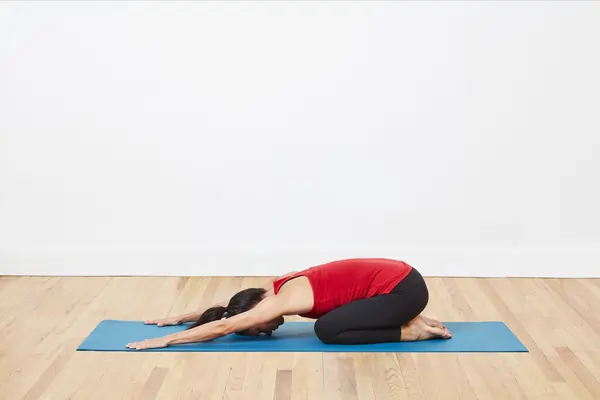
- Take a tabletop posture and begin on your hands and knees.
- Gently spread your knees to a comfortable distance after bringing your big toes together.
- Return your hips slowly to your heels.
- If your wrists hurt, extend your arms forward and gently lay your hands on the floor. Alternatively, rest your arms next to your body.
- Put your forehead on a cushion or yoga block, or lower it toward the mat.
- Your upper back, neck, and shoulders should all be relaxed.
- Hold the posture for 20 to 30 seconds while taking deep, continuous breaths.
- Return to the starting position gradually.
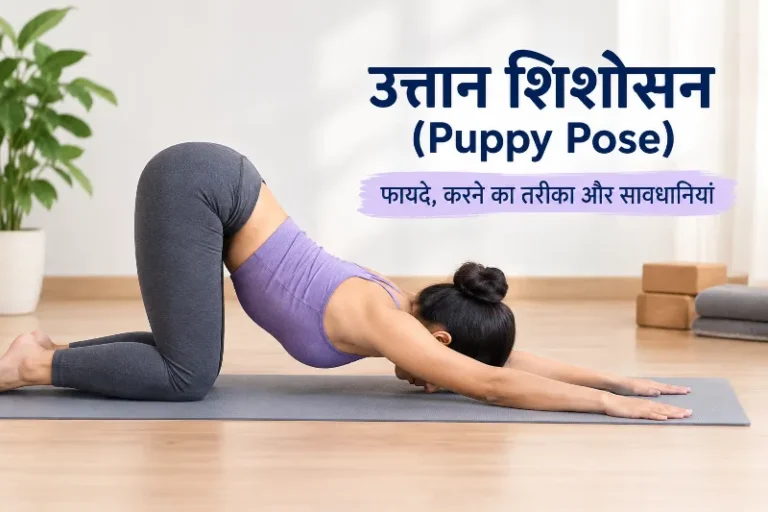
Extended Puppy Pose (Uttana Shishosana)
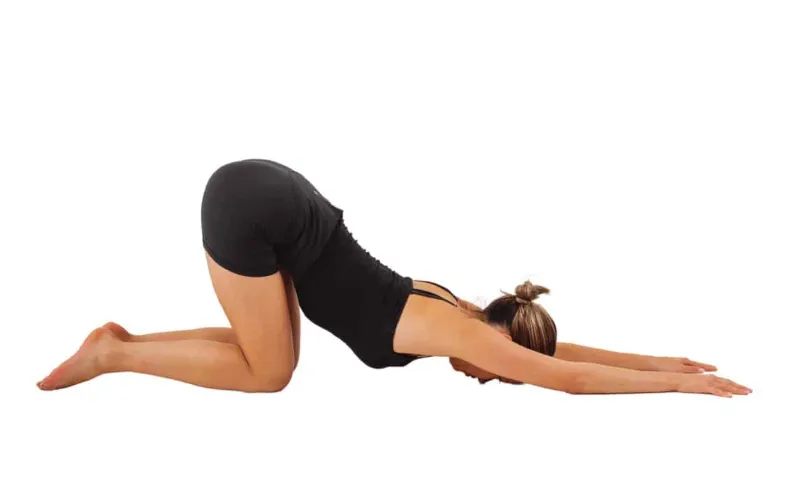
- With your knees behind your hips and your wrists beneath your shoulders, begin on your hands and knees in a tabletop posture.
- Make sure your hips are exactly above your knees.
- Keep your arms straight and move your hands forward slowly.
- With your forehead resting on the mat, gently lower your chest toward the floor.
- Don’t allow your hips to drop back into your heels; rather, keep them up over your knees.
- With your elbows up, loosen your shoulders and neck.
- Hold the posture for 20 to 30 seconds while breathing slowly and comfortably.
- Return to the tabletop by slowly moving your hands back toward your body.
Dolphin Pose (Makarasana variation)
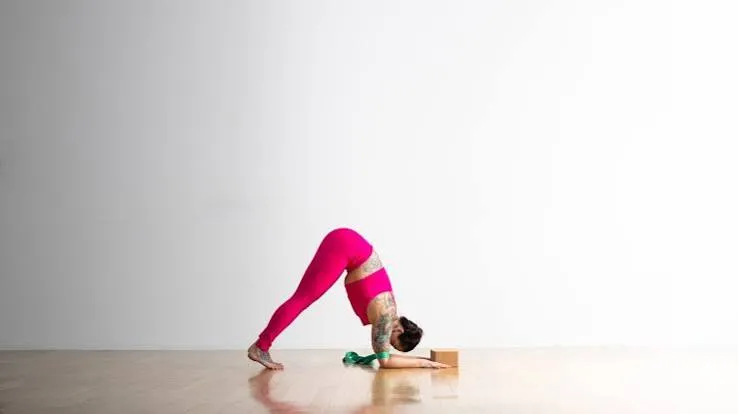
- Start in a tabletop posture on your hands and knees.
- Keeping your elbows just behind your shoulders, lower your forearms to the mat.
- With your hands flat on the ground, align your forearms parallel to one another.
- Gently raise your knees off the ground while tucking your toes beneath.
- Make an inverted V shape with your body by slowly raising your hips forward and backward.
- Avoid rounding your lower back and maintain a long spine.
- Avoid applying pressure on your head and maintain a comfortable position between your upper arms.
- Breathe gently and slowly while holding the pose for 15 to 30 seconds.
- Return to the beginning posture by gently lowering your knees back to the mat.
Precautions:
- Do not suddenly increase the number of wrist-loading positions or their length.
- The wrist should not be pushed to its maximum rearward bending position. When needed, adjust the wrist angle using a block, folded mat, yoga wedge, or fists. Props may reduce the strain on sore wrists.
- If wrist pain is severe, start with chair yoga, moderate seated side bends, breathing techniques, and Seated Mountain Pose instead of postures that call for using the hands to support body weight. Weight-bearing on the wrists can be avoided with chair yoga.
FAQs
What is the fastest way to cure wrist pain?
Using the RICE approach (Rest, Ice, Compression, and Elevation) in conjunction with an over-the-counter anti-inflammatory drug like ibuprofen is the quickest way to treat acute wrist pain.
Which exercise is best for wrist pain?
The mild wrist flexion and extension stretch, which reduces stiffness and increases joint mobility, is the best exercise for wrist pain. To execute it, extend your arm, point your fingers toward the floor by bending your wrist, and then bring it closer with your other hand for 15 to 30 seconds before reversing.
Will wrist pain ever go away?
Yes, wrist pain nearly always goes away, but the length of time it takes to heal depends largely on the source. While persistent disorders like tendonitis, arthritis, or carpal tunnel syndrome may require focused treatment, bracing, physical therapy, or even surgery to properly recover, mild sprains or minor overuse heal in a few days to two weeks with rest.
How to strengthen wrists for wrist pain?
Place your forearm on a table with your hand dangling off the side to reduce wrist pain and increase strength. Use a small weight or resistance band to do two to three sets of ten to fifteen repetitions of wrist flexion and extension, making sure the motions are painless and gradual.
What vitamin deficiency causes wrist pain?
Deficiencies in vitamin D, which impacts bone and pain signals, and B vitamins, such as B6 and B12, which maintain nerve function, have occasionally been related to wrist pain and nerve compression problems like carpal tunnel syndrome. But dietary deficiencies are rarely the only underlying reason.
What are the best ways to relieve wrist pain?
Wear a supportive wrist splint, take over-the-counter anti-inflammatory medications such as ibuprofen, rest the joint, and apply an ice pack for 15 to 20 minutes to promptly and safely reduce wrist pain. You can also avoid persistent strain by gently stretching and adjusting your computer keyboard position.
References:
- Thompson, E. (2023, May 30). Wrist pain? Practice these 10 stretches to reduce pain and prevent injury. YouAlignedTM. https://youaligned.com/yoga/how-to-stretch-your-wrists-yoga-for-wrist-pain/
- Ryt, G. Z. 2., & Ryt, G. Z. 2. (2026, July 3). Yoga for Wrist Pain: 7 poses and modifications for sensitive wrists. Yogajala. https://yogajala.com/yoga-for-wrist-pain-7-poses-and-modifications-for-sensitive-wrists/
- Motal, B. (2025, February 21). Yoga and wrist pain. The Injury Clinic. https://www.theinjuryclinic.com/post/yoga-and-wrist-pain/