Yoga for Peripheral Neuropathy
Introduction
Yoga for peripheral neuropathy may help support balance, flexibility, circulation, and overall mobility. Gentle poses, stretching, breathing exercises, and relaxation techniques can be useful when practiced safely and within your comfort level.
Understanding the whole metabolic picture is helpful because peripheral neuropathy, type 2 diabetes, and nerve pain often coexist; check our information on whether yoga may help decrease blood sugar.
What Is Peripheral Neuropathy?
Damage to the peripheral nervous system, which transmits impulses to your limbs, skin, and organs, is known as peripheral neuropathy. The traditional symptoms pins and needles, numbness, scorching or stabbing pain, muscular weakness, and an annoying lack of balance occur when these nerves malfunction.
The “stocking-and-glove” pattern of symptoms usually begins in the feet and progresses upward, which is why many people with neuropathy first notice it when they have trouble sleeping at night or when walking barefoot feels strange.
Common causes
The most common cause is diabetes; up to 50% of people with long-term diabetes may experience nerve damage. Chemotherapy, vitamin B12 deficiency, heavy alcohol use, autoimmune diseases, thyroid problems, and nerve compression are additional common offenders.
Sometimes there is no explanation at all (idiopathic neuropathy). Regardless of the source, the management objectives are the same: prevent more harm to the nerves, increase blood supply to them, and retrain strength and balance to maintain a safe and active daily life.
How Yoga Helps Nerve Pain
Yoga treats almost all of the secondary issues that neuropathy causes, but it cannot repair a damaged nerve. First, movement and inversion-style poses promote blood flow to the hands and feet, which is precisely what peripheral nerves that are having trouble require.
Second, standing poses are a tried-and-true method of retraining proprioception; falls are one of the main practical concerns of neuropathy; and balance training restores the stability that numb feet steal. Third, calm breathing and relaxation techniques reduce the nervous system’s amplification of pain, which is important since a stressed, hypervigilant nervous system contributes to the maintenance of chronic nerve pain.
This strategy is also supported by research for similar disorders. The foundation of yoga for diabetes is gentle movement practice, where better glucose management directly delays nerve damage. Yoga for chronic pain is based on similar nervous-system-calming techniques. Particularly for neuropathy, after 8–12 weeks of consistent practice, individuals with diabetic and chemotherapy-induced neuropathy report lower pain levels, greater balance, and a higher quality of life.
Benefits of Yoga for Peripheral Neuropathy
May Improve Nerve Health: According to the Foundation for Peripheral Neuropathy, a moderately strenuous exercise regimen like yoga or walking may alleviate neuropathic pain and sensory abnormalities. In general, exercise is an essential component of effective neuropathy treatment.
Additionally, yoga is thought to activate neurotransmitters and neurological connections, which could reduce the pain associated with nerve injury. Over the course of nine days, researchers investigated naturopathy and yoga-based therapies in a study including 76 individuals with type 2 diabetes.
Individuals in the intervention group demonstrated significant improvements in nerve function and decreases in blood glucose, body mass index, and oxidative stress when compared to a control group that only received oral hypoglycemics. Although more research is required, the authors believe that integrative methods may aid in the management of diabetic neuropathy.
May Strengthen Muscles: Neuropathy may eventually lead to weakness and muscle atrophy. Yoga could be a low-impact, gentle method to build muscle without making your symptoms worse.
May Increase Balance and Stability: Because peripheral neuropathy affects the nerves that keep you balanced, it can raise your risk of fractures and falls. Regular exercise helps improve mobility, strength, balance, and speed.
Frequent yoga practice may enhance stability and balance. Yoga can be a long-term strategy to help you become more confident in your movements and reduce your chance of falling, but it won’t instantly eliminate dangers.
May Improve Sleep: Many people with peripheral neuropathy have excruciating nighttime flare-ups that cause them to sleep poorly. These flare-ups may be set by stress, twitching, or muscle pain.
Yoga may also be able to provide some help in this area. Yoga seeks to calm your body and mind by combining deliberate breathing with stretching.
Over time, yoga practice may help reduce chronic pain and stress, which may be interfering with your sleep or making it difficult for you to fall or remain asleep.
May Enhance the Mind-Body Connection: In yoga, practicing attentive breathing and paying attention to your body’s physical sensations can help you develop a deeper understanding of what makes your body feel good or uncomfortable. Building the mind-body link is the term for this.
Off the mat, this relationship is also useful. For instance, it could help you determine which activities or chores you feel comfortable completing and which you may choose to skip.
May Reduce Stress: Practising yoga every day can teach you how to deal with the stress and challenges of peripheral neuropathy.
Although there is no cure for peripheral neuropathy, meditation techniques can help you learn how to manage your stress since they increase your awareness and acceptance of the present. Put another way, you can more readily transition into a pattern of acceptance off the mat once you start breathing and being present on the mat.
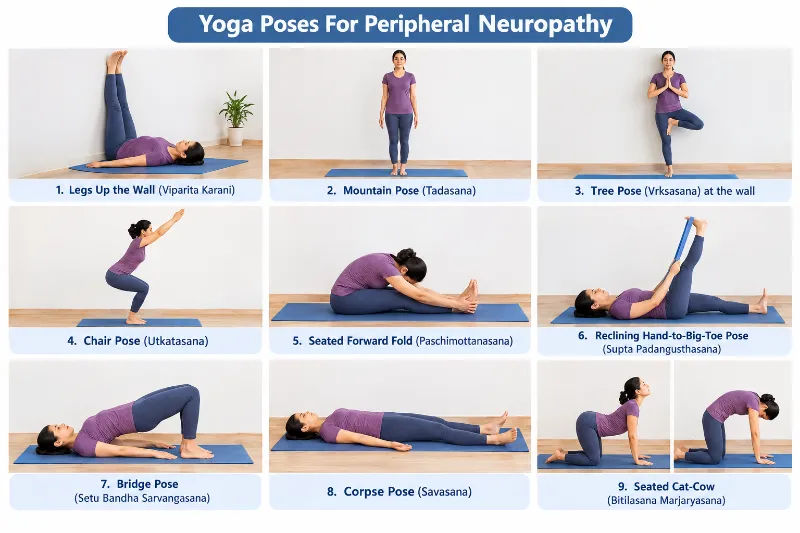
8 Yoga Poses For Peripheral Neuropathy
On a non-slip mat, practice these postures barefoot with assistance from a wall or a sturdy chair. Move gently; your hands and eyes become your safety gear as you lose feeling. For nerve health, consistency is more important than intensity, so aim for most days of the week.
Viparita Karani (Legs-Up-the-Wall Pose)
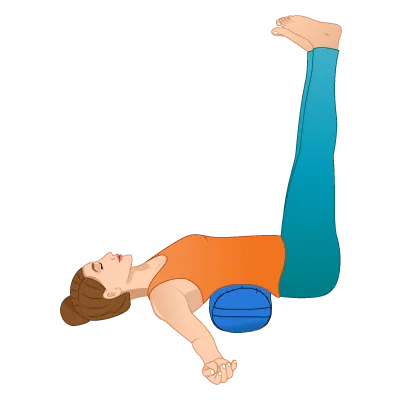
This restorative inversion drains oedema from the feet and encourages fresh blood flow on the way back down. Swing your legs up, sit sideways against a wall, and keep your arms by your sides. Breathe gently for five to ten minutes. It’s normal if your feet tingle more than usual at first; this usually goes away as circulation becomes better. For comfort, place a folded blanket under your hips.
Steps:
- Turn your yoga mat so that it faces the wall. If a bolster is being used, place it between 6 and 12 inches away from the wall.
- As you sit, make sure your right hip touches the wall. The transition is more seamless in this posture.
- As your torso drops to the floor, softly lift your legs while leaning back into your forearms.
- Move your hips closer or farther apart until the position is comfortable. Prioritise comfort above precise alignment.
- Allow your sacrum, not your lower back, to rest on the bolster if you are using one. The wall should feel like it is supporting the legs rather than stretching them.
- Place your arms in a comfortable “goalpost” position at your sides, palms up, or overhead. For neck relief, keep your chin slightly tucked in.
- Reduces mental stimulation and aids in nervous system relaxation.
- During prolonged holds, a comfortable blanket keeps you warm and promotes relaxation.
- To start, take five to ten deep breaths to calm your body. After that, let your breathing restore its regular pattern.
- Maintain the position:
- Beginners: 5 to 10 minutes
- Intermediate: ten to fifteen minutes
- 15 to 20 minutes for restorative practice
Tadasana (Mountain Pose)
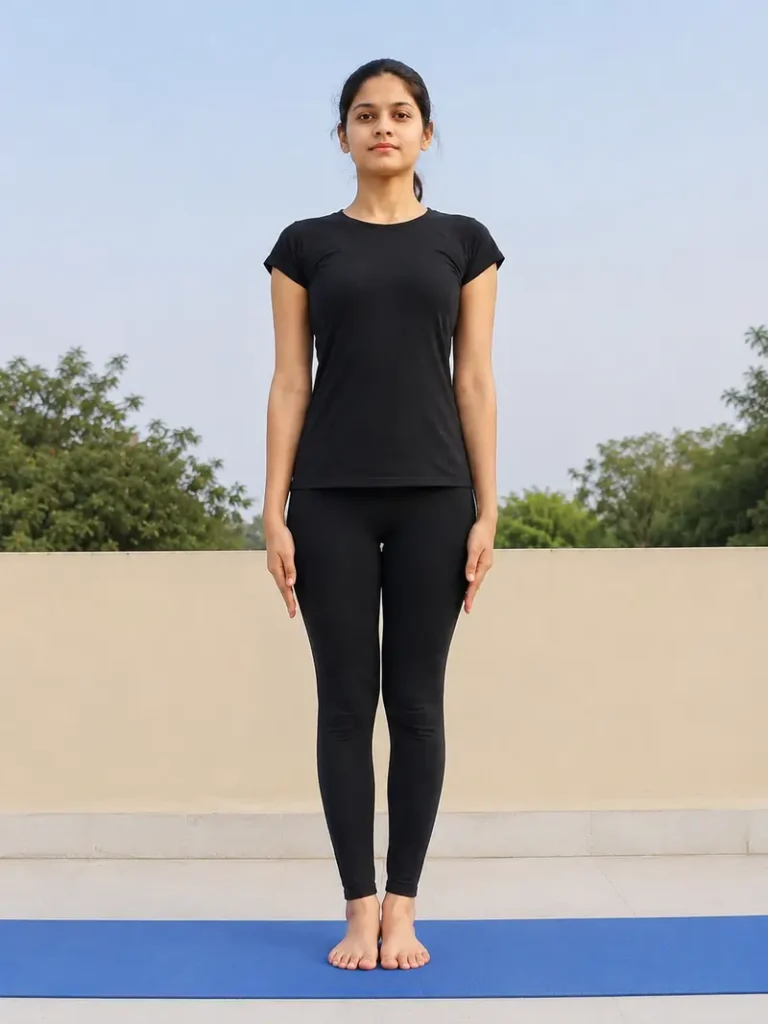
A relatively easy core-balancing exercise is mountain pose. Spread your toes wide, place your feet hip-width apart, and carefully apply pressure through each foot’s heel, little toe mound, and big toe mound. This intentional “mapping” of the foot re-engages the sensory pathways you still have because neuropathy dulls the signals from your soles. Hold with your eyes open for ten calm breaths.
Steps:
- At the front of your mat or on any level surface, take a tall position.
- Keep the feet hip-width apart if that seems more solid, or bring the feet together with the big toes touching and heels slightly apart.
- Apply equal pressure to each of the foot’s four corners: the inner heel, outer heel, base of the big toe, and base of the little toe. Gently spread the toes, then let them settle back down.
- Lift the kneecaps without locking the knees to gently engage the legs. Maintain an energetic gait while drawing the inner thighs slightly closer to one another.
- Gently extend the tailbone toward the floor and slightly bring the lower abdomen in to achieve a neutral pelvis.
- Avoid overarching the lower back or tucking the pelvis too much.
- Extend the spine upward toward the crown of the skull while maintaining the back’s natural curve. Instead of pressing forward, let the lower ribs soften inward.
- Arms should be relaxed next to the body. Allow the shoulders to freely descend and rise without becoming rigid. The hands may be slightly forward or facing the thighs.
- Soften the eyes, jaw, and face. Maintain a steady, forward-looking gaze.
- As you settle into the position, take slow, deep breaths through your nose.
- Wait for: 30 to 60 seconds (beginners)
- One to three minutes (intermediate)
- Five minutes or more (advanced)
- As a reset between standing positions, tadasana can also be maintained for three to five breaths.
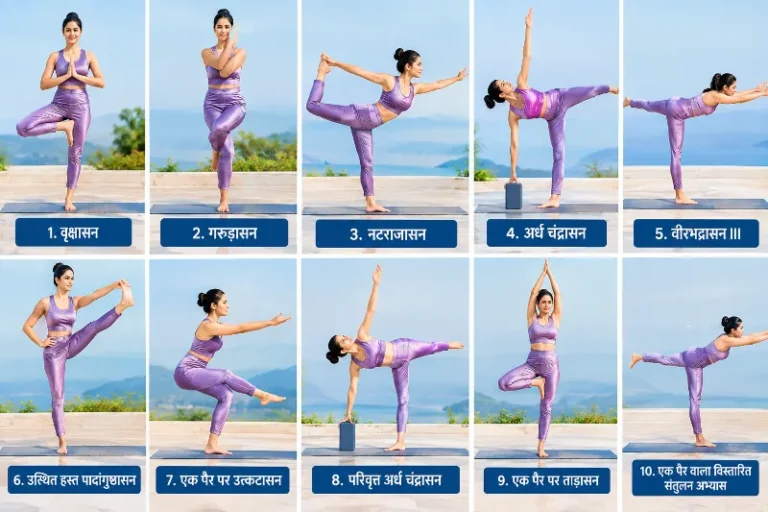
Vrikshasana (Tree pose)
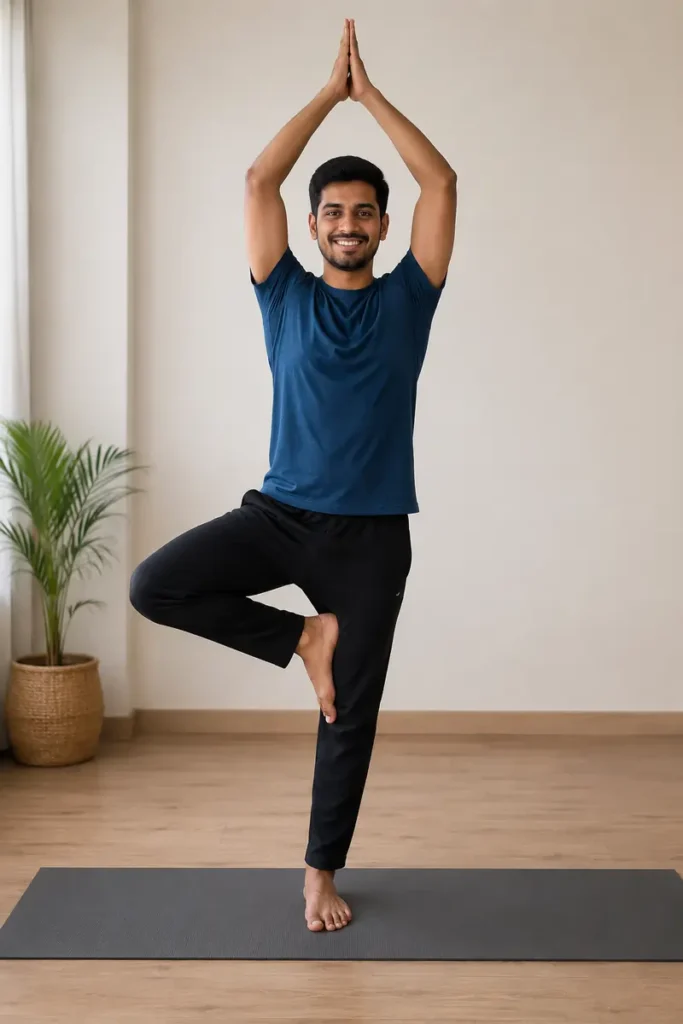
The traditional proprioception rebuilder is Tree Pose. Stand close to a wall with one hand on it, and place one foot only on the other person’s ankle or calf (never the knee). Hold each side for 20 to 30 seconds. As your balance improves over a few weeks, hover the wall rather than pushing it with your hand. Avoid closing your eyes since neuropathy makes vision more difficult to balance.
Steps:
- Hold your arms loosely at your sides and stand tall in the mountain pose.
- With your right knee bent, elevate your right foot on your left thigh. Press firmly against your left inner thigh with the sole of your right foot.
- Verify that your left leg, while standing, is straight. Discover your equilibrium.
- After you’re stable, inhale deeply and place your palms together at your chest in the Namaste (prayer) position. Don’t tighten your shoulder blades.
- You can either raise both of your arms over your head in Namaste or spread them out to resemble a wide-topped tree, depending on how comfortable you are.
- Gently focus your attention on a stationary item in front of you. Keeping your eyes steady helps you stay balanced.
- Keep your back straight and continue to breathe deeply. For five to ten breaths, maintain the position.
- Gently lower your hands to your sides as you exhale slowly.
- Return to mountain position by gently lowering your right foot to the floor.
- This time, place your left foot against your right thigh and repeat on the opposite side.
Utkatasana (Chair Pose)
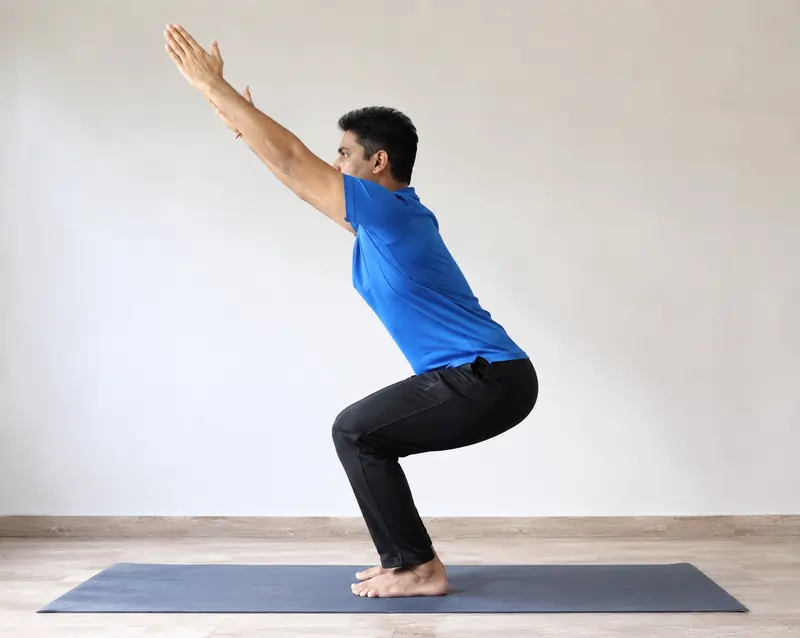
The thighs, glutes, and ankles that support a body with unsteady feet are strengthened by chair pose. Bend your knees, stand with your feet hip-width apart, and recline like you’re in a chair with your arms on your hips or front. Maintain your weight in your heels. Hold five to eight breaths, then repeat three times. Numb feet are quite well compensated for by strong legs.
Steps:
- In Tadasana, stand in the middle of your yoga mat.
- Gently raise your arms above your head with each deep breath.
- Now, exhale while bending your knees, keeping your legs close to one another.
- As if you were sitting in an imagined chair, bend your knees and squat narrowly.
- Extend your spine overhead and flex both arms. To keep your legs balanced on the ground, maintain a strong core.
- Return to the mountain posture to gently release the pose after holding it for five to ten long breaths.
Paschimottanasana (Seated Forward Fold)
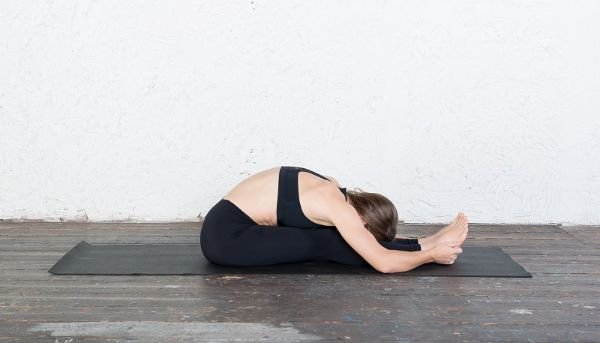
The whole posterior chain should be gently glided. Loop a strap over your feet, sit tall with your legs outstretched, and bend forward from your hips only slightly. This provides a safe, gradual mobilization of the sciatic nerve and its branches to the feet. Never push; always bend your knees gently. Hold for 1-2 minutes.
Steps:
- Sit with your legs straight in front of you and either hip-width apart or together.
- Make sure your sitting bones are elevated.
- Breathe in and extend both arms parallel to your ears toward the ceiling.
- Continue reaching forward as you exhale, bending forward and extending your hands toward your toes.
- Put your nose on your knees. Hold your ankles, shins, or even your knees if you can’t reach your toes.
- Place your elbows on the ground.
Supta Padangusthasana (Reclining Hand-to-Big-Toe Pose)
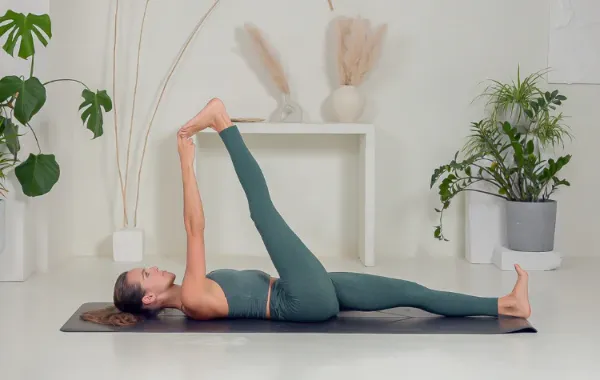
While lying on your back, bend or stretch one leg on the floor while looping a strap around one foot and extending that leg toward the ceiling. This is perfect for situations when balance is lacking since it combines hamstring release with a controlled nerve glide, and the reclining posture makes it totally fall-proof. Hold each side for one minute.
Steps:
- Inhale deeply, release the breath, and rest on your back. Here, contract your core muscles such that the navel is attempting to reach the tailbone.
- Avoid bending or rotating your right leg when you lift it. Just maintain your toes pointed and the raised leg straight.
- In a straight resting position, place the left arm on the left side. Next, reach your right foot’s toes with your right arm extended overhead.
- Breathe in, straighten your leg, keep your pelvis stable, and keep your left leg level on the floor.
- Repeat this position on the opposite side after holding it for ten to thirty seconds on each side.
Setu Bandhasana (Bridge Pose)
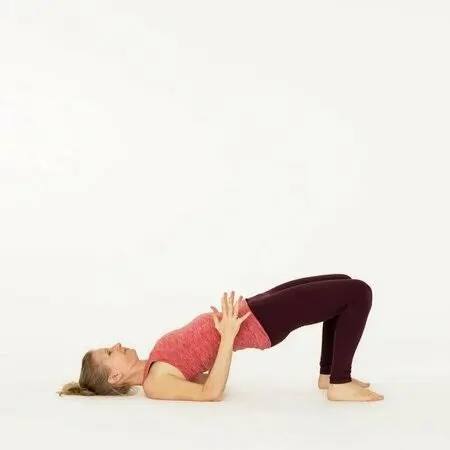
Bridge improves circulation to the legs, strengthens the hamstrings and glutes, and gently activates the nervous system. Lift your hips while applying equal pressure through both feet while lying on your back with your feet flat and hip-width apart. Pressing is a form of sensory retraining in and of itself. Hold five breaths, release them gradually, and repeat three to five times.
Steps:
- Lying on your back, bend your knees and rest your feet flat on the mat, hip-width apart.
- When your arms are resting along your body, walk the heels in until your fingers can barely touch them.
- Make sure your feet are parallel and facing straight forward. Ankles are stacked above knees. With your hands facing down, press the backs of your shoulders and upper arms onto the mat.
- Press through both feet equally as you inhale. To stabilize the spine, softly pull the lower ribs toward the mat and lightly contract the inner thighs and glutes.
- Lift your hips gradually as you breathe out, beginning from the tailbone and lifting your spine one vertebra at a time off the mat. Continue raising your body until your thighs are roughly level with the ground.
- To expand the chest, roll the shoulders slightly below them. For a milder variation, you can keep your hands flat or interlace your fingers under your torso and press your arms down.
- Maintain a steady breathing pattern, sturdy knees, and lightly engaged glutes while holding the posture. Don’t tilt your head; keep your neck neutral.
- Beginners: 2–3 rounds, 20–30 seconds
- Intermediate: 3–5 rounds, 30–45 seconds
- Restorative (supported bridge): use a block beneath the sacrum for three to five minutes.
- Breathe out and slowly drop your spine back down, starting with your upper back and finishing with your tailbone. To neutralize the spine, take a few breaths while hugging the knees toward the chest.
Savasana (Corpse Pose)
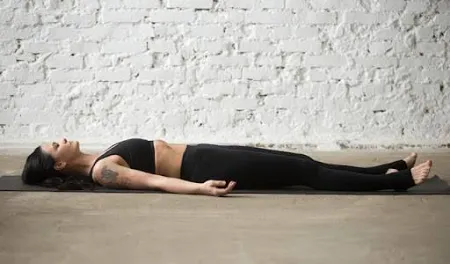
Complete each session here. Lie flat, close your eyes, and slowly lift your gaze from your toes, noticing any feelings without judging. In addition to serving as a minor sensory remapping for neuropathy, body scans have been shown to reduce the pain associated with chronic pain. Spend five to ten minutes.
Steps:
- Lie flat on your back with your arms close to your body, palms facing up, and your legs together but not touching.
- Breathe slowly and deeply through your nose while keeping your eyes closed and your facial muscles relaxed.
- Pay attention to every area of your body, starting at the top of your head and working your way down to your feet. Consciously relax each section before moving on to the next.
- For no less than three to five minutes, stay in the shava-asana. Breathe a little more deeply and quickly if you start to feel drowsy while performing the shava-asana.
Bitilasana Marjaryasana (Seated Cat-Cow)
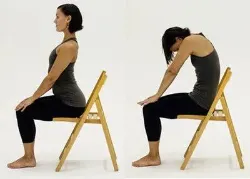
- Place your feet firmly on the floor while perched on the edge of a chair.
- Exhale for five seconds, then extend your hands shoulder-high in front of you.
- Let your head drop slowly between your hands.
- After taking a five-second breath, bring your hands closer to your body and draw your elbows into your ribs at a 90-degree angle.
- Raise your head once more as you inhale.
- Continue doing this for eight rounds.
Safety Tips
The rules of practice are altered by numbness. You may not notice a blister or cut developing, so check your feet both before and after each session. For each standing position, keep a chair or wall within arm’s reach and practice on a clean, covered, smooth surface.
If the tops of your feet are extremely numb, avoid prolonged kneeling positions; if your hands are afflicted, avoid excessive wrist loading. The adjustments in our yoga for carpal tunnel syndrome guide work well in this situation. Lastly, check your blood sugar during practice if you have diabetic neuropathy, as your levels may change due to greater insulin sensitivity.
Conclusion
- Diabetes and other illnesses are frequently associated with peripheral neuropathy, which is nerve damage that results in tingling, numbness, and pain (usually in the hands and feet).
- By enhancing nerve health, boosting blood flow, and soothing the nervous system in addition to enhancing balance, strength, sleep, and general function, yoga may help reduce the symptoms of peripheral neuropathy.
- Leg-supported Savasana and seated Cat-Cow are two easy, adaptive postures that can help you safely relieve tension and reestablish a connection with your body.
- Before beginning a yoga practice, see your physician, particularly if you have pain, mobility problems, or other health conditions.
FAQs:
Can yoga repair nerve damage?
Yoga can greatly assist in controlling nerve pain, improving circulation, and promoting general neurological rehabilitation, but it cannot fundamentally heal or regenerate severed or severely injured nerve tissue.
Can neuropathy be healed naturally?
Whether neuropathy can be reversed naturally depends entirely on the underlying cause and how early the nerve damage is addressed
Can yoga help with neuropathy in the feet?
In order to treat neuropathy symptoms like tingling and numbness, gentle yoga helps increase blood flow, activate nerve endings in the feet, and help with lower-body balance.
What vitamin reverses neuropathy?
B-complex vitamins, particularly vitamin B1 (as benfotiamine) and vitamin B12, might help heal nerve damage and cure symptoms if your neuropathy is directly caused by a vitamin deficiency or high blood sugar. However, no single vitamin “reverses” all forms of neuropathy.
What are the best yoga poses for nerve problems?
By relaxing the nervous system and decompressing the spine, gentle, restorative yoga postures like Child’s Pose, Cat-Cow, and Legs Up the Wall are the best ways to reduce nerve issues.
What is a good morning routine for people with neuropathy?
For those with neuropathy, a healthy morning routine focuses on boosting blood flow, reducing first-step discomfort or falls brought on by nighttime stiffness, and gently activating nerves.
References:
- Staff, Y., & Staff, Y. (2026, September 12). Yoga for Peripheral Neuropathy: Poses to ease nerve pain. Yogajala. https://yogajala.com/yoga-for-peripheral-neuropathy/
- Galic, B. (2025, August 28). 4 Yoga exercises for peripheral neuropathy and how to get started. EverydayHealth.com. https://www.everydayhealth.com/neuropathy/yoga-for-peripheral-neuropathy/