
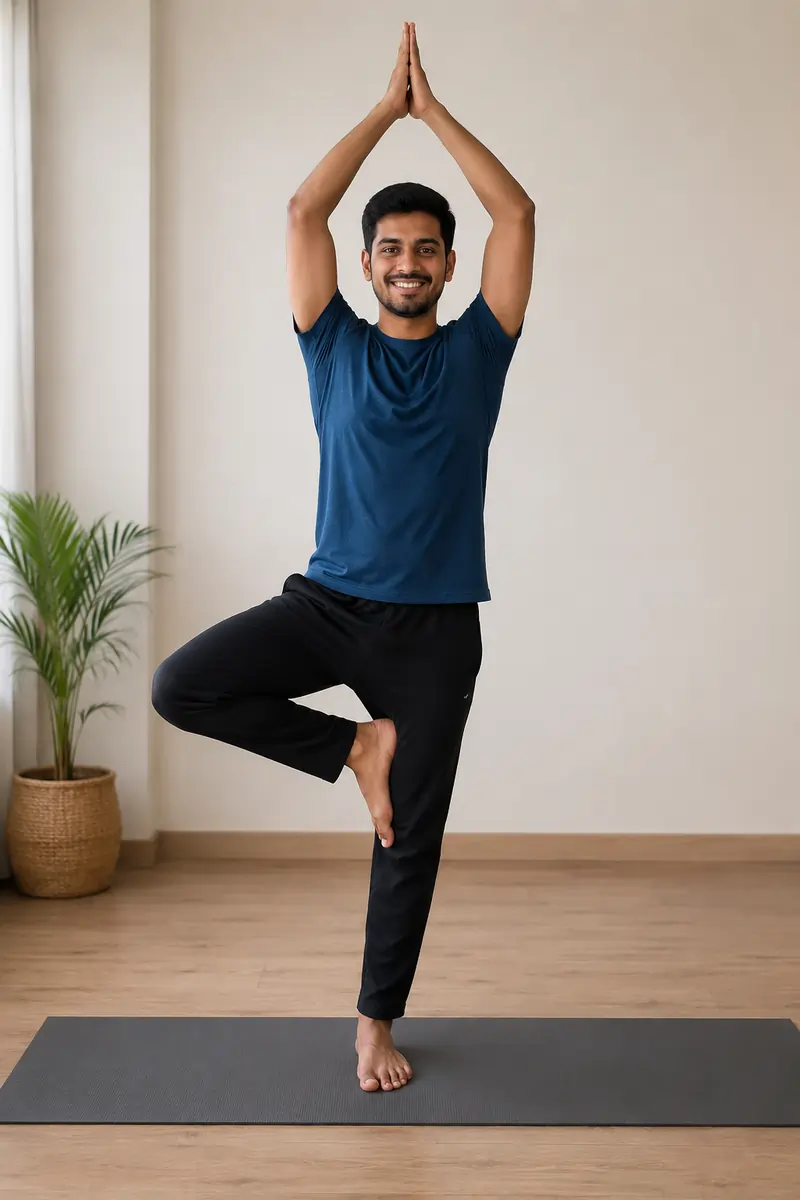
Vrikshasana (Tree pose)
Introduction
Vrikshasana (Tree Pose) is a classic standing yoga posture that helps improve balance, stability, and concentration.
When life feels like a storm pulling you every which way, standing steady becomes something special. Hatha yoga offers just such an anchor through Vrikshasana – better known as Tree Pose. Not flashy or intense, this shape doesn’t demand wild bends or iron arms.
Instead, it quietly invites you to lift one foot and simply stay put on the other. But try doing that when your mind races, and suddenly even bark seems more stable. This piece walks through where the pose began, how it works in the body, what it does for awareness, plus clear steps to grow into it fully.
Newcomer or familiar face on the mat, there’s grounding here for everyone, helping feet press down so everything else can stretch taller.
Meaning and Symbolism
- Start with words themselves – they carry memory. Vriksha means “tree,” rooted deep in old Sanskrit speech. Asana points to the seat, stance, and the way we hold space. Put them together: Tree Posture, not just named after nature but shaped by its calm presence.
- Across stories and thought systems from India, trees appear again and again – silent guardians, givers of shelter, bridges between earth and sky. Patience, endurance, and strength given freely – these come to mind when people think of trees. Standing firm despite scorching sun, heavy downpours, wild gusts, one still provides cooling shade, food, safe spaces, no matter who arrives.
- Doing Vrikshasana means more than copying a form with your body; it’s about tuning into what a tree truly represents. From the ground up, balance begins in the feet – imagine them as roots digging deep. The centre of your body forms a sturdy trunk, while arms stretch high like limbs stretching through the air toward sunlight. This pose becomes a quiet reflection shaped by steady presence, soft power, and lasting toughness.
Biomechanics and Anatomy of Vrikshasana
Foot and Ankle Stability: The Foundation
- One leg holds everything when you stand still. Because of this, staying upright needs constant feedback from within the body – like knowing where limbs are without looking. Balance depends on signals sent through nerves below the skin and inside joints. Without that inner awareness, even small shifts could tip you over.
- Foot muscles inside the sole tweak posture nonstop. At the shin’s front, one muscle fires often to steady movement. Along the outer calf, two others engage on and off to support the ankle. Balance shifts keep them active without pause.
- Start at the base. Balance shows up when weight settles into four spots on each foot. Think of the pad under your big toe first. Then shift slightly to the outside edge near the pinky toe. The inside part of the heel takes some load too. Finally, the outer portion of the heel joins in. These points work together without calling attention to themselves.
The Hip and Pelvic Structure
- Levelling the pelvis becomes tricky when one leg turns outward in Vrikshasana. Still, balance shifts subtly with each breath. A slight tilt often sneaks in without warning. Yet alignment holds meaning only if awareness stays steady. Even then, the body resists symmetry naturally.
- When one leg supports body weight, the small muscles at the outer hip need to work hard. Without enough strength there, the pelvis tilts sideways during stance. That shift pulls the backbone out of balance. Pressure builds where it should not, especially around the hip socket.
- Out to the side, the knee moves when the small hip rotators – like the piriformis, gemelli, and obturators – tighten up. At the very same time, on that raised leg, the inner thigh group gets longer, pulled gently apart.
Core Engagement with Axial Extension
- Rooted firmly, a tree stands only if its base is solid. When the centre stays loose, the spine bends too far backwards, wobbling like a sapling in the wind. Stability slips fast when support fades.
- Deep inside, the transversus abdominis wraps tight like a belt, holding the pelvis steady. Up front, the rectus abdominis pulls without tipping the hips. Along the back, muscles called erector spinae lift the spine straight up. This happens while the belly wall stays engaged, balancing the stretch. Spinal length comes from both sides working – front resisting, back pulling.
Shoulder Girdle and Arms
- As the arms lift upward, stability in the shoulder blades keeps pressure off the neck. Reaching high requires control through the upper back so the neck stays clear. With elevation of the limbs, support from the scapula avoids strain below the skull. Lifting the arms skyward means the shoulders need grounding to protect the cervical area. When moving into an overhead position, solid blade placement stops tension from creeping up the spine.
- Downward pressure on the shoulder blades comes from the middle and lower trapezius, along with the rhomboids. Arms reach up through the effort of the deltoids and triceps, forming either a closed prayer pose at the chest or spreading into a wide V. Position depends on how far apart the hands move during the motion.
Muscle Engagement and Body Mechanisms
- Breaking it down: where does the effort show? Every inch matters here, starting underfoot, ending with the fingertip farthest out. One leg bears weight, the other rests bent, creating an imbalance that asks both halves of you to respond differently.
- Study the drawing nearby showing muscle use. Notice how each side handles its role distinctly. Balancing here means stability meets expansion in subtle ways. One leg holds everything up, muscles tight but still, holding firm without shifting. That foot down below? Tiny bones and cords inside it tweak by themselves, second after second, just so you stay vertical – building strength where few notice.
- Thigh muscles, front and back, turn on strong, guarding the knee, stopping it from going too far one way or another. Out at the outer hip, a small muscle works hard without praise, tugging sideways to stop your pelvis from tipping, keeping things even across. Meanwhile, the raised leg moves in three directions at once – up, outward, open.
- Inside the groin, tissues lengthen while hidden muscles behind the hip tighten, dragging the bent knee backwards, creating space. And there, the bottom of that lifted foot pushes steadily against the inner part of the grounded thigh – contact held, pressure shared. Energy flows in a circle here, pushing back through the leg as the foot pushes down.
- For steady balance, the body stays tall when the belly and back muscles stay switched on along the spine. Upper back holds firm using shoulder blades pulled gently together while arms reach high.
Modifications and Progressions
What matters most with yoga shows up differently for everyone. Vrikshasana bends without breaking, shaped quietly by how your body moves today – just starting or stepping further in.
For Beginners Building Confidence
- Start by letting the toes of your raised foot just touch the ground. Instead of lifting fully, slide the heel back to meet the inner side of your standing ankle. With that contact, the balance spreads across three points now. Even so, the hip continues working toward openness. Stability comes without losing the stretch.
- Back up close to a wall, leaving just a small gap behind you or near one shoulder. Should wobbling happen, touch the surface gently to steady yourself before tipping too far. Balance returns fast when contact is soft and quick.
Advanced Practice Deepening
- Darkness shifts control inside. Shutting out sight strips away most signals that keep you steady. When vision fades, the mind leans entirely on fluid in the ears. Hidden awareness in muscles takes charge without warning.
- Overhead, let your eyes drift upward – following the path of raised thumbs. A shift begins there. Then, without rush, guide your face side to side, pulled gently by motion rather than stillness. Gaze floats, not locked, but flowing like water finding its way. Each movement is slight, deliberate, unhurried. Vision leads where stiffness once held control.
- Ardha Padma Vrikshasana (Half Lotus Tree Pose): Slide the right foot gently into the fold of the left hip, pressing its sole there instead of up on the thigh. Let the right knee aim straight down to the ground – settled like a hinge opening low. The shape forms quietly when the leg folds halfway, held without force.
How to Practice Vrikshasana?
Learning Tree Pose works better if built slowly from the start. Each part counts as progress made clear by staying aware. Wobble happens; catch breath again after returning to the last stable point.
Step 1: Establish a Stable Base
Mountain Pose:
Feet meet at the tips, but lift heels just off centre. Start standing so each foot carries equal pressure, spread out at all edges. Arms fall without effort down beside your hips. With eyes shut, take three full breaths, noticing how the surface below holds you up.
Step 2: Focus Your Gaze
Look ahead once more, fixing sight on one still spot, maybe on the floor or wall. That place becomes your anchor for gaze.
Step 3: Shift Your Weight
Move all heaviness into the left leg, leaving the right light. Start by tightening the muscles in your left leg – the quads and butt – so it stays completely still.
Step 4: Position the Raised Foot
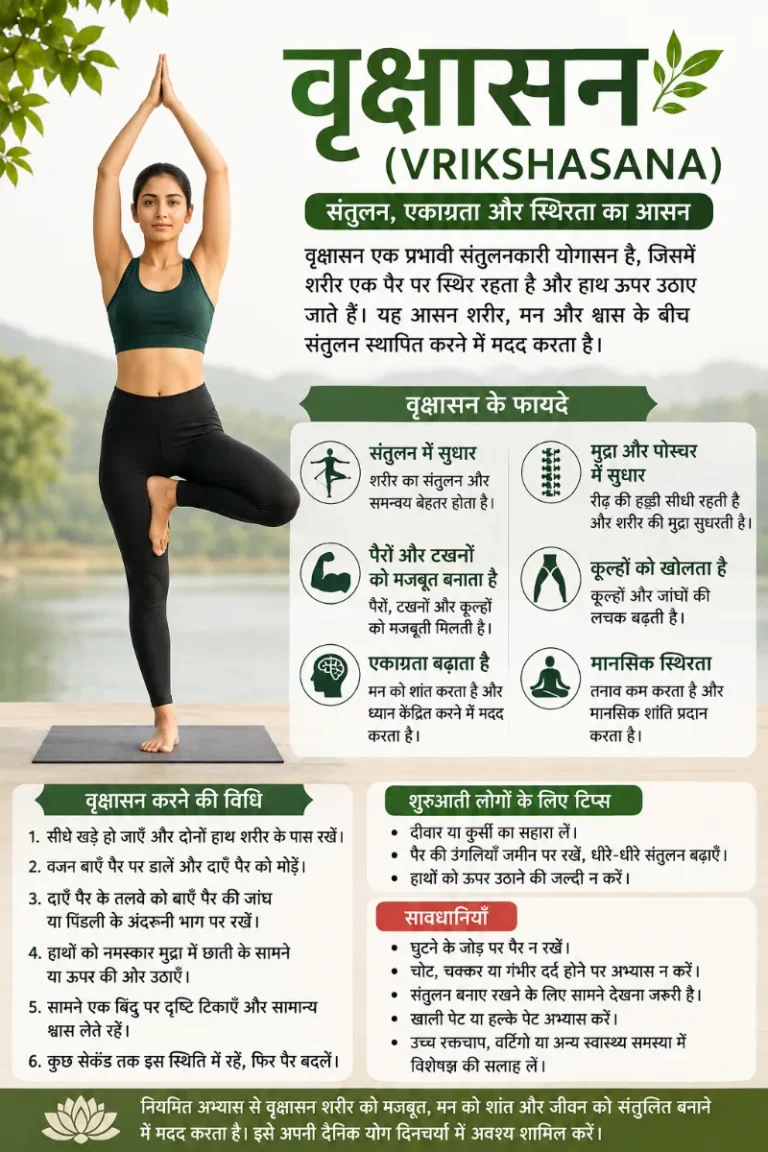
Now shift attention to the right foot, setting placement first for safety and proper line-up. Bend the right knee outward, guiding it toward the right. Lower your right hand, touching the sole of that foot to the inside of your left leg. Here’s what matters most – the foot lands high on the inner thigh or lower on the inner calf. Putting weight across the side of the knee risks harm to ligaments, so skip that spot entirely.
Step 5: Create Stability
Begin pushing with the right foot into the left leg’s inner surface. At the very same time, resist gently using the left leg, meeting the pressure equally. Pressure here locks the pelvis in place, forming a firm core.
Step 6: Lift the Arms
Hands meet at chest level, palms touching, fingers pointing upward. With breath drawn in full, stretch arms overhead – slow, smooth, continuous. Fingers may stay joined or part ways, reaching outward like limbs swaying in the wind. Ears stay clear of shoulders; tension has no role here.
Step 7: Hold the Pose
Stillness holds through five slow cycles of air moving in and out, sometimes more.
Step 8: Return to Standing
As breath leaves the body, guide arms downward, returning to heart space. Unhook the right leg gently. Stand balanced again on two feet.
Common mistakes to avoid
- Most people doing Tree Pose get this wrong – they press the raised foot right into the knee. That spot cannot take sideways force without trouble building up. Put your foot higher, along the inside of the thigh, or lower on the calf instead. Pressure lands are safer there.
- Out there among frequent missteps? Letting the hip on your standing side drift out to the side sneaks into form. That little shift tends to wobble your base, throwing balance off track. Hold tight through the outside part of that planted leg’s hip – it pulls everything back into line.
- Some people forget to breathe when they’re focusing on staying steady. Yet air needs to move gently, without force, during the entire position. Out of balance? A steady breath in or out stops tightness before it grows.
Precautions and Safety Considerations
- Anyone thinking this fits all fitness levels could be mistaken. When joints ache – especially after injury – it pays to take care. Moving too fast on weak ankles, sore knees, or tender hips often backfires. A wall nearby could help. Sometimes sitting on a chair while practising parts of the pose makes sense.
- Anyone feeling dizzy or unsteady might try this position slowly, especially if a professional suggests it. Starting gently makes sense when balance feels off. Guidance helps when movements tilt or spin. Some find stability comes more easily, step by step. Going slow matters most at first.
- Should balance be tricky, try resting the raised foot’s toes on the ground while pressing its heel into the supporting leg – this version offers steadier footing at first.
Conclusion
Standing like a tree might seem basic, but it asks for much beyond just staying upright. One breath at a time, attention settles, feet press down, muscles engage without force. Picture roots stretching deep, even when winds shift above.
Over days of returning to the stance, small shifts add up – steadiness forms, thoughts clear, tension loosens. Not everything loud makes a difference; sometimes quiet holding teaches the most.
FAQs
What are the primary physical benefits of practising the Vrikshasana pose daily?
Practising the Vrikshasana pose daily provides comprehensive lower-body strengthening by targeting the ankles, calves, and quadriceps. It actively engages the gluteus medius to stabilise the pelvis and promotes a healthy spinal alignment. Furthermore, the Vrikshasana pose significantly enhances proprioception, helping the nervous system improve overall body balance and posture over time.
Why is it dangerous to place your foot directly on the knee joint during the Vrikshasana pose?
Placing your foot on the knee in the Vrikshasana pose creates harmful lateral pressure that can easily strain or damage the knee ligaments.
How can a beginner safely maintain stability while attempting the Vrikshasana pose?
A beginner can maintain stability in the Vrikshasana pose by fixing their gaze on a single unmoving point or by lightly touching a wall for support.
Which main muscle group is strengthened in the standing leg during the Vrikshasana pose?
The Vrikshasana pose strongly works the gluteus medius and ankle stabilisers of the standing leg to keep the pelvis completely level.
How should your breath flow while holding the Vrikshasana pose?
You should maintain a deep, slow, and continuous diaphragmatic breath to steady your nervous system and prevent swaying in the Vrikshasana pose.
What is the correct hip alignment required for a safe Vrikshasana pose?
A: Both hip bones must face straight forward like headlights to prevent any twisting injuries to the lower back during the Vrikshasana pose.
References:
- Smith, E. N. (2024, October 5). Vrksasana (Tree pose): growing roots. YogaUOnline. https://yogauonline.com/pose-library/vrksasana-tree-pose-growing-roots/
- https://www
- .yogajournal.com/poses/tree-pose-2/
- Cpatterson. (2022, July 4). VRksasana: Tree pose. Gaia. https://www.gaia.com/article/vrksasana-tree-pose
- Arhanta Yoga Ashrams. (n.d.). Tree Pose – Vrkshasana – Arhanta Yoga. https://www.arhantayoga.org/tree-pose-vrksasana/
- Yogapedia. (2023b, November 26). Tree pose. Yogapedia. https://www.yogapedia.com/yoga-poses/tree-pose/11/10777
14 Comments