Yoga for Cricket Players
Introduction
Adding yoga to your routine has several advantages, regardless of whether you play cricket as a hobby or as a serious sport. The adaptability of this practice is what makes it so lovely. It can be an excellent warm-up to get your body ready for the game if you do it with shorter holds and fewer breaths. However, doing these stretches at the conclusion of your workout can help relieve pain and soreness and hasten healing.
The majority of the muscle groups that cricket players use for batting, bowling, fielding, and running are targeted by these stretches. Yoga can help you play cricket more effectively and avoid injuries by increasing your strength, flexibility, and mobility.
In addition to their regular training, yoga can provide cricket players with a peaceful opportunity to practice balance, body awareness, and gentle movement. It’s not necessary for a beginner’s routine to be lengthy or physically demanding. Start with a range of motion that is comfortable for you right now, steady breathing, and simple forms. This article describes how to create a basic cricket practice, what should be left out, and when to see a physician or other trained healthcare provider before starting.
What is yoga for cricket players?
It is a mild movement exercise that can be used in conjunction with cricket practice. Yoga helps a person discover comfortable movement through poses, breathing, and awareness. Without mimicking a hard workout, a cricket-focused session can incorporate standing, sitting, and balance shapes. The objective is to practice carefully, not to demonstrate adaptability or take the place of coaching tailored to a particular sport.
Why do some players try yoga?
Yoga can be used by athletes to spice up a training week and provide quiet concentration. After practice, a slow session allows time to observe breathing, body position, and the sensation of movement. Some people want a program that differs from fielding, bowling, or batting drills. Since everyone’s experience is different, consider yoga to be an optional support system rather than a guarantee of improved performance.
Yoga’s place beside cricket
Yoga is most effective when added to a player’s regular routine. Maintain the appropriate responsibilities for strength training, rest, cricket coaching, and clinical guidance. If a new routine affects the weekly workload, let a coach know. While a challenging or unfamiliar lesson could require more work than expected, a few gentle motions may work nicely.
What movements does cricket involve?
Players in cricket must react to shifting action and move in multiple directions. Players have distinct roles in batting, bowling, wicketkeeping, and fielding, each of which has its own needs. Never presume that a single yoga pose is appropriate for every cricket player. Ask your coach how to incorporate simple exercises that feel applicable to your own practice into the schedule.
How should a beginner start?
Start with a quick, simple session on a level surface. Choose a peaceful area where you can sit and stand without running into any furnishings. Keep water close at hand in case you need it, and dress in loose-fitting clothing. Start with a few well-known forms, go at a moderate rate, and stop if anything looks strange, sharp, or alarming.
Step 1: Set up safely
Before you start moving, make the area clear. Move bags, bats, and other equipment out of the way and place a firm surface or non-slip pad beneath your feet. If you are unsure about your balance, keep a chair nearby for support. Make sure you have adequate space to extend your arms without coming into contact with someone or a wall.
Step 2: Check in with your body
Prior to selecting the movements, take note of how you feel. Take a moment to stand calmly and note whether you feel stiff, fatigued, or uncomfortable. After a lengthy game or a hard training day, be extremely cautious during your first practice. To count a session as beneficial, a player does not have to endure suffering.
Step 3: Warm up gently
As opposed to doing heavy stretches, start with gentle, relaxed motions. If it feels comfortable, bend and straighten the knees, move the weight between the feet, and roll the shoulders in an easy range. One easy technique to investigate the spine is to perform a few rounds of Cat-Cow Pose. Stay away from imposing an end position and make every action fluid.
Step 4: Add a standing shape
To improve your balance and focus, adopt a solid standing position. Place your feet comfortably apart and keep your arms by your sides. Instead of locking your knees, soften them and maintain your focus on a single, stable point. For beginners, a Mountain Pose can be an easy place to start without trying to achieve a striking shape.
Step 5: Finish on the floor
To finish at a comfortable pace, adopt a supported floor position. If you feel safe and at ease on the floor, you can lie down or sit on a folded blanket. Maintain little movement and allow for positional changes as needed. While choosing a different resting position is acceptable, a supported Child’s Pose is one possibility.
Use breathing without strain
Throughout the session, allow your breathing to remain calm and organic. Without holding your breath or attempting to inhale as deeply as you can, observe the air coming in and going out. If you find a breathing exercise uncomfortable, stop and resume your regular breathing. It is not a test of lung capacity; gentle belly breathing is an optional activity.
Benefits of Yoga for Cricket Players
Increases Joint Mobility and Range of Motion: The majority of sports require joints to move freely and completely; a tight thoracic spine or limited hip reduces power output and raises the chance of injury. Frequent yoga practice helps athletes move more effectively and with less compensating by gradually opening these movement patterns.
Speeds Up Muscle Recovery: Muscle tissue experiences microtears and metabolic waste as a result of rigorous exercise. Yoga’s slow breathing, stretching, and relaxation poses assist the parasympathetic nervous system, which controls recovery and rest. Regular yoga practitioners frequently report feeling less sore and more prepared for their next practice.
Builds Core Stability for Better Athletic Control: Every athletic movement starts with a stable core, which is more than just having strong abs. Yoga improves balance, agility, and power transmission during sports by strengthening deep stabilizing muscles around the spine and pelvis that are rarely isolated by regular gym practice.
Sharpens Breath Control Under Pressure: Yogic breathing, or pranayama, teaches athletes how to deliberately control their breathing, a technique that comes in very handy when competing at a high level. Improved respiratory control promotes sustained effort, quicker recovery in between bursts, and more composed decision-making when fatigued.
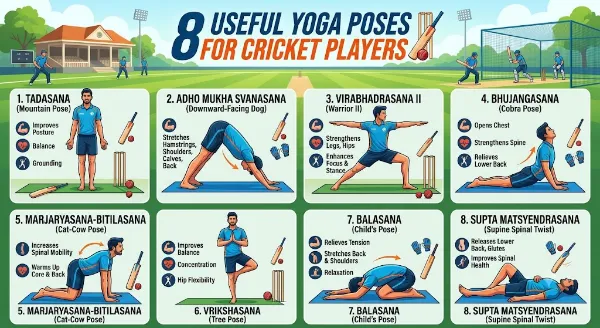
8 Useful Yoga Poses for Cricket Players
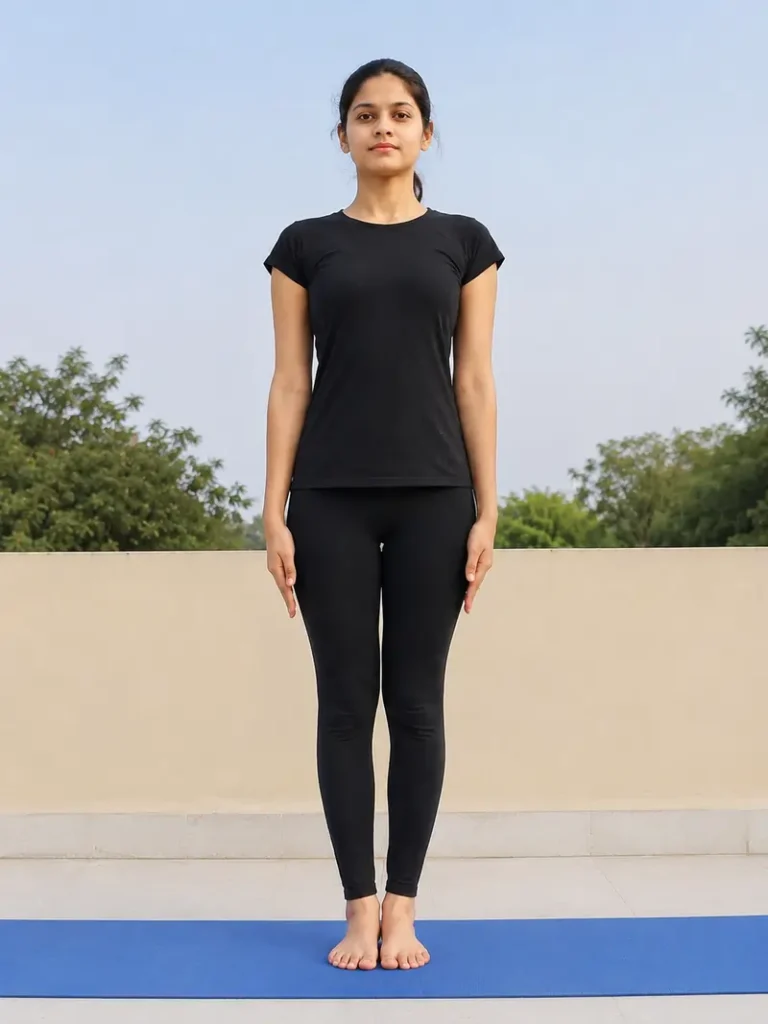
Tadasana (Mountain Pose)
Steps:
- At the front of your mat or on any level surface, take a tall position.
- Keep the feet hip-width apart if that feels more stable, or bring the feet together with the big toes touching and heels slightly apart.
- Apply equal pressure to each of the foot’s four corners: the inner heel, outer heel, base of the big toe, and base of the little toe. Gently spread the toes, then let them settle back down.
- Lift the kneecaps without locking the knees to gently engage the legs. Maintain an energetic gait while drawing the inner thighs slightly closer to one another.
- Gently extend the tailbone toward the floor and slightly bring the lower abdomen in to achieve a neutral pelvis. Avoid overarching the lower back or tucking the pelvis too much.
- While keeping the back’s natural curvature, extend the spine upward through the crown of the skull. As opposed to pressing forward, allow the lower ribs to soften inward.
- Soften the eyes, jaw, and face. Maintain a constant, forward-looking eye.
- Take easy, continuous breaths through your nose as you settle into the pose.
- Hold for:
- 30 to 60 seconds (beginners)
- 1 to 3 minutes (intermediate)
- 5 minutes or more (advanced)
- As a reset between standing positions, tadasana can also be held for three to five breaths.
Adho Mukha Svanasana (Downward-Facing Dog)
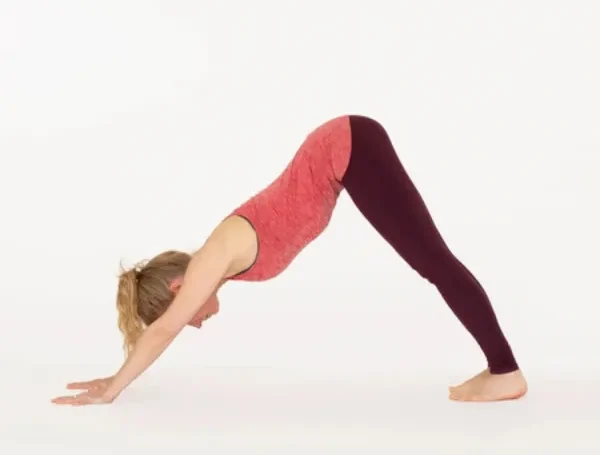
Steps:
- Drop to your hands and knees, keeping your wrists below your shoulders and your knees below your hips. Spread your fingers widely and apply even pressure through your palms.
- Keep your elbows gently bent rather than locked. To stabilize the shoulders and broaden the upper back, gently rotate the upper arms outward so that the biceps face slightly forward.
- As you exhale, tuck your toes under and raise your knees off the mat. To create an inverted V, raise and lower your hips. At first, keep your knees bent.
- Using your hands to push the floor away, concentrate on increasing length from the wrists through the hips. Avoid collapsing the shoulders as you softly bring the chest toward the thighs.
- To maintain proper alignment if your hamstrings feel tight, keep your knees bent. Maintain a long spine while progressively straightening the legs if flexibility permits. It is not necessary for heels to touch the ground.
- Gently draw the lower abdomen in to avoid flaring the ribs. This core support not only protects the lower back but also keeps positions balanced.
- Allow the head to fall freely between the arms while maintaining a relaxed neck. Don’t try to stare forward; instead, focus on the navel or thighs.
- Maintain the position while breathing steadily:
- For beginners, take five to ten breaths.
- 10–20 breaths in the middle
- Advanced: one to three minutes
- Each inhale extends the spine, while each exhale allows the body to relax and find balance.
- Return to Tabletop or Child’s Pose after bending the knees and gently lowering them to the mat. Breathe a few times deeply before you start up again.
Virabhadrasana II (Warrior II)
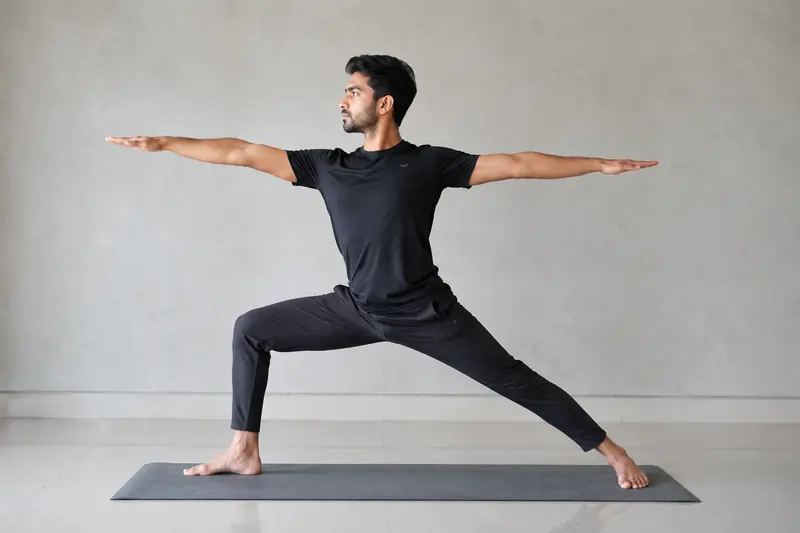
Steps:
- Put your hands on your hips and balance your weight equally between your feet while standing on the mat.
- Beginning in Adho Mukha Svanasana (Downward-Facing Dog Pose), move your foot slightly to the right, step your right foot forward, and line up your toes with your fingertips.
- Make sure your front foot thigh is parallel to the mat and your front leg knee is bent at a 90-degree angle. Keep your toes pointed toward the front end of the mat. Additionally, maintain your back leg engaged and flexed.
- As you lift your arms above your shoulders and then above your head in Namaste, inhale, bend your leg forward, and look up in front of you. At this point, let go completely.
- Feel the stretch across your lower abdomen as you extend your arms overhead and slightly bend your front knee.
- After five to ten cycles of deep inhalation and exhalation, let go to relax. Now do the same on the opposite side.
- Breathe deeply while raising your hands over your head or in the air.
- Breathe out as you release the position.
- Beginner’s Performance Duration: Hold this warrior pose I for five to ten deep breaths.
- Advanced Performance Duration: Maintain this warrior pose I for one to three minutes.
Bhujangasana (Cobra Pose)

Steps:
- Extend your legs and gently press the tops of your feet into the floor while lying face down on the mat. Put the mat to your forehead.
- Spread your fingers widely, place your palms flat beneath your shoulders, and keep your elbows tight to your body.
- Gently engage your glutes while you press your feet, thighs, and legs into the mat.
- Take a breath, raise your chest using your back muscles, and press your pubic bone down.
- Expand your collarbones and raise your sternum forward by rolling your shoulders back and down.
- As comfortably as you can, straighten your arms while keeping your elbows flexible and your eyes gently forward or slightly upward.
- Hold your breath continuously for 15 to 30 seconds if you’re a beginner, or up to 1 to 3 minutes if you’re an expert.
- Breathe out, lower your forehead, shoulders, and chest softly to the mat, and tilt your head to one side to ease your neck.
Marjaryasana–Bitilasana (Cat–Cow Pose)
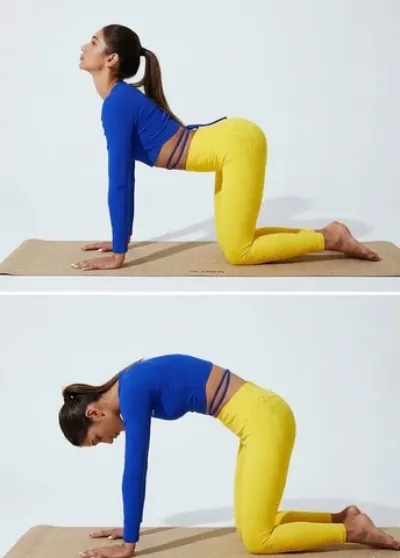
Steps:
- Spread your fingers, maintain a long neck and neutral spine, get on your hands and knees with your wrists beneath your shoulders and your knees under your hips, and take a few deep breaths to center yourself.
- As you lower your belly, raise your chest, widen your collarbones, pull your shoulders away from your ears, elevate your sitting bones, and softly raise your eyes without straining, take a breath through your nose (Cow Pose).
- At the peak of your inhale, pause for a moment, feel your chest open and your spine naturally curved, and be ready to reverse the movement.
- Breathe out completely as you tuck your chin and tailbone in, bring your navel in, press the floor away, round your spine toward the ceiling, and feel your back stretch (Cat Pose).
- Imagine a wave moving from tailbone to head as you effortlessly move at the speed of your breath, inhaling to Cow and exhaling to Cat.
- Prioritize rhythm over repetitions and practice 5–8 rounds (1–2 min), 8–12 rounds (2–3 min), or 15–20 rounds (3–5 min). If your breathing gets irregular, stop.
- After finishing on a neutral tabletop, take two to three deep breaths and, if needed, rest for a short while in Child’s Pose.
Vrikshasana (Tree Pose)
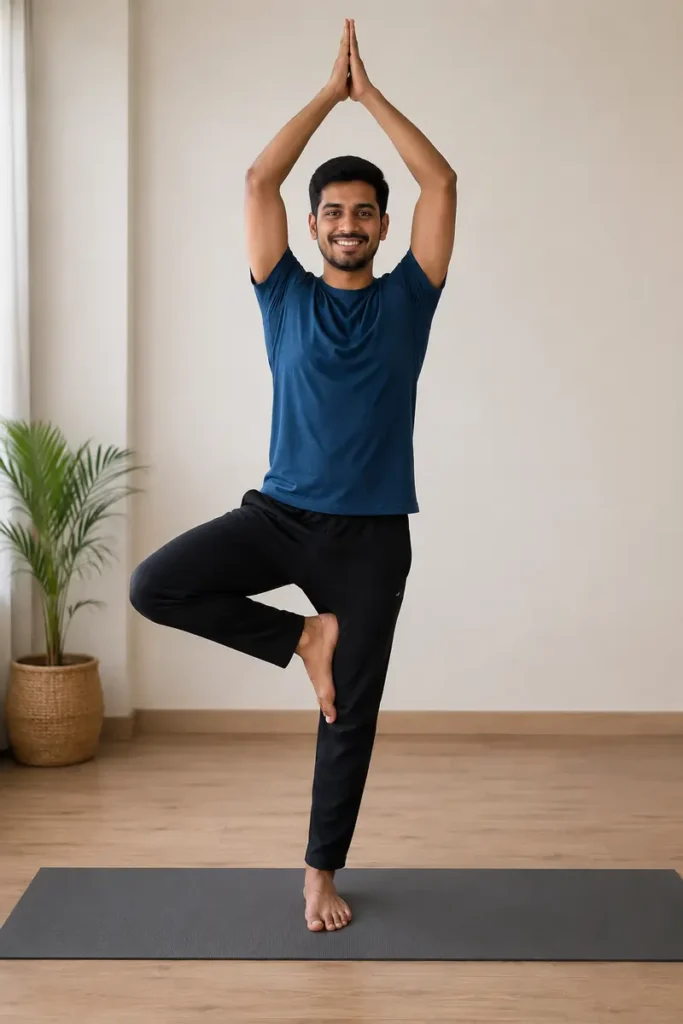
Steps:
- Start with your feet hip-width apart in Mountain Pose (Tadasana). Evenly grind your big-toe mounds, heels, and outside edges.
- Take three to five deep breaths, relax your shoulders, and stretch your spine.
- While maintaining a soft standing knee, shift your weight into your left foot. Feel the leg contract from the foot to the hip, then take a moment to steady yourself.
- Focus your attention at eye level on a stable point just ahead. This stage is crucial for balance, so keep your eyes relaxed but attentive.
- Bend your right knee and raise your foot as you exhale.
- Place the foot’s sole above the knee on the inner thigh, inner calf, or inner ankle. The foot should never be placed directly on the knee joint.
- For stability, gently press the standing leg and raised foot toward one another.
- Make sure your hips are facing forward. Draw your lower stomach in to gently activate your core.
- Grow tall through the crown of the head while remaining grounded through the standing foot.
- Choose an arm pose that helps you stay balanced: one hand gently resting on a wall, arms raised aloft with palms together, hands at heart center, or arms in a gentle “V.”
- Breathe easily while you hold the pose with your shoulders relaxed.
- Beginnings: 15 to 30 seconds
- 30 to 60 seconds is intermediate.
- Advanced: up to two minutes
- Calmly move outside and start over if you lose your equilibrium.
- Lower your arms first, then carefully return the raised foot to the ground for safety.
- Go back to Mountain Pose, take a few deep breaths, and then switch sides.
Balasana (Child’s Pose)
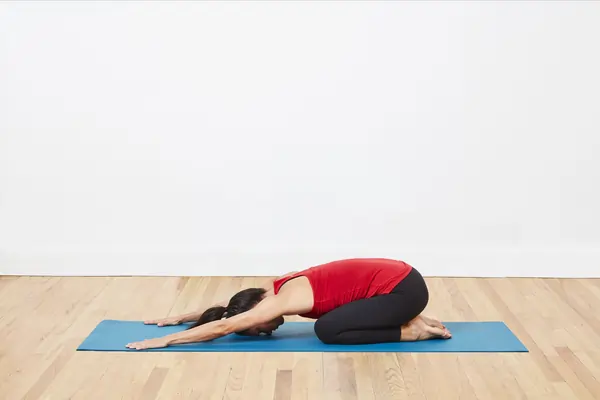
Steps:
- Put your hands under your shoulders and space your knees hip-width apart. To ensure that the tops of your feet are comfortable on the mat, point your toes straight back.
- Keep your knees apart and allow your big toes to gently touch each other. When you fold forward, this makes room for your chest and abdomen.
- Breathe out slowly and shift your hips into your heels. Pay attention to your knees and thighs and just go as far as is comfortable.
- Place your forehead on the mat or a cushion and allow your chest to naturally descend between or over your thighs.]
- Put your arms in this position:
- Extended version: To lengthen your spine, extend your arms forward, palms down.
- Restorative version: For more profound relaxation, place your arms next to your body with your palms facing up.
- Let your shoulders drop away from your ears, and your chest relax in the direction of the mat.
- Breathe in to extend your sides and back; breathe out to relieve tension. Depending on how comfortable you are, stay for 30 seconds to several minutes.
- Maintaining a long spine, slowly raise your torso upright while walking your hands back toward your knees.
Supta Matsyendrasana (Supine Spinal Twist)
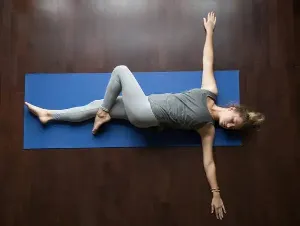
Steps:
- Close your eyes and take a few deep breaths to relax while lying comfortably on your back with your legs outstretched, arms outstretched in a T form, and palms facing up.
- To relieve your lower back, bend your knees and gently pull them toward your chest while rocking slightly from side to side.
- With both shoulders firmly planted on the mat, extend your arms back out to shoulder height, palms up or down for comfort.
- With both knees stacked or slightly apart, slowly lower them to the right side as you exhale.
- If your neck feels constricted, keep your head neutral or gently turn it to the left, away from your legs.
- Use your right hand to lightly press your top knee to deepen the twist, or adjust by supporting your knees with a folded blanket or block.
- Breathe deeply into your belly and let your body soften with each exhale as you hold the twist for one to three minutes.
- Breathe in to bring your knees back into alignment, then gently hug them to your chest to balance your spine.
- After exhaling, turn your head to the right and perform the same twist on the left side for the same duration.
- Go back to the center, hug your knees to your chest again, and then spread your legs wide on the mat while either remaining motionless or performing Savasana.
Safety precautions
- After your workout or in the early morning, practice.
- Repeat each pose two or three times after holding it for 20 to 30 seconds.
- Throughout each pose, pay attention to your breath.
- Respect your limits and don’t push your body too much.
- Always conclude your session with deep breathing exercises or meditation.
Conclusion
The results of the current review show that injuries are common among cricket players, with notable variations based on playing positions and contributing factors. Batsmen and fielders are susceptible to muscular strains and overuse injuries, while fast bowlers are especially vulnerable to back and shoulder conditions.
Reducing injury rates in cricket requires controlling training loads, enhancing playing conditions, and putting specific injury prevention techniques into practice. Including yoga in a cricket player’s training regimen offers several preventive advantages, such as boosting strength and flexibility, enhancing mental focus, and facilitating recovery.
Cricket players may be able to enhance their performance, avoid injuries, and adopt a holistic approach to health by including yoga in their workout routines.
FAQs:
Is yoga good for cricketers?
By strengthening the entire body and enhancing reflexes, Pilates and yoga can help reduce cricket-related injuries. Strong, flexible bodies are less likely to sustain injuries, particularly when performing cricket stretches.
Does Virat Kohli do yoga?
Virat Kohli’s fitness philosophy was revealed: The fitness icon follows a vegan diet and does yoga in addition to working out.
Is yoga better than running?
While yoga improves mental attention, breath control, and body awareness, it helps you stay concentrated throughout lengthy runs, manage pain, and perform more effectively. Running increases physical endurance. When combined, they produce a comprehensive regimen that enhances strength, flexibility, recovery, and general performance.
Is 20 minutes of yoga a day enough exercise?
In actuality, modest, persistent efforts are frequently more long-lasting and advantageous. Therefore, keep in mind that 20 minutes of yoga a day can change your body, relax your mind, and enhance your general health, regardless of whether you’re new to the practice or want to include a doable routine into your daily life.
What is the best time to do yoga?
Practice at the quiet, peaceful times of the day, especially in the early morning (before or around daybreak) and late at night (after sunset). Because the surroundings are usually quieter and the body’s natural rhythms are more favorable to practice, these times are said to be ideal.
References:
- 10 Best Yoga Stretches For Cricketers – Yoga with Archana Alur. (2024, December 16). https://yogawitharchanaalur.com/2024/12/16/10-best-yoga-stretches-for-cricketers/
- Sinha, R., & Sinha, R. (2026, October 21). Beginner yoga for cricket players: A simple guide. Ranjana Yoga Class – Online yoga, meditation, courses and personal guidance with Ranjana. https://ranjanayogaclass.com/yoga-for-cricket-players-for-beginners/
- S, A., & S, A. (2025, July 4). Top 7 yoga poses every cricketer should practice daily. VINOX SPORTS – Top Quality Online Sports Shop India. https://vinoxsport.com/top-7-yoga-poses-every-cricketer-should-practice-daily/
- Integrating Yoga into Cricket: A Contemporary Approach to Performance and Well-Being. (n.d.). https://ijip.in/pdf-viewer/?id=48382