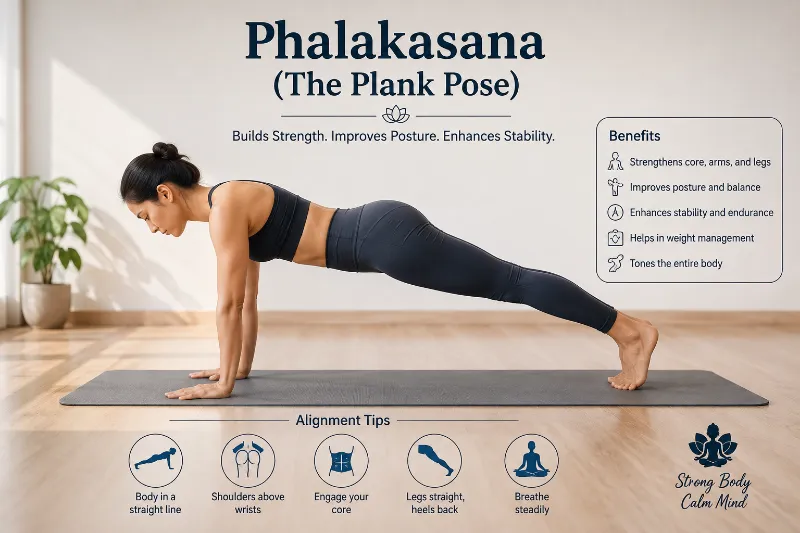
Phalakasana (Plank Pose)
If you practice yoga, you’ve most likely encountered Phalakasana, sometimes known as the Plank Pose. This position is ideal for anyone looking for core strength, stability, and a body that feels aligned and strong. Whether you’re new to yoga or a seasoned practitioner, the Plank Pose is timeless. Let’s go over how to do it, why it’s so wonderful, and what to look out for.
What is Phalakasana?
- A fundamental yoga stance is Plank Pose, also known as Phalakasana. Although it looks simple, it tests every part of your body, particularly your arms, shoulders, legs, and core. Phalakasana provides a full-body exercise without the need for expensive equipment—just you, your mat, and a little perseverance.
- It is a pose that can serve as a foundation for more complex poses and is utilised in various yoga sequences, such as Sun Salutations. Phalakasana is a great technique to develop strength, endurance, and attention, whether you’re holding it for a short while or working your way up to longer durations.
Phalakasana Benefits
Regular practice of this asana has numerous physical advantages. The principal advantages of Phalakasana are:
- Strengthening the core involves strengthening the deep stabilising muscles, obliques, and abdominal muscles.
- Stronger arms, wrists, and shoulders: This position strengthens the upper body and teaches the shoulders to remain stable and stacked under stress.
- Improved posture: The slump caused by extended periods of sitting is mitigated by a stronger back and core.
- Spinal support protects the lower back and fortifies the muscles that run down the spine.
- Increased awareness of one’s body and balance: the plank is a crucial preliminary strength for arm balances like Bakasana (Crow Pose).
- Toned thighs and glutes: to maintain the body in a straight line, the thighs and glutes remain active.
- Increased metabolism and stamina: maintaining the stance increases heart rate and strengthens the entire body.
- Phalakasana is a mainstay in both Vinyasa flows and Hatha yoga sessions because it requires the entire body to collaborate.
Physical Benefits
- Strengthens the Abdominal and Deep Core
- In a single isometric hold, the plank posture strengthens the obliques, lower back, transverse abdominis, and rectus abdominis. Research on plank training reveals quantifiable improvements in core endurance between four and six weeks.
- Enhances Wrist, Shoulder, and Arm Strength
- Phalakasana is almost as beneficial to the upper body as the core. Together, the shoulders, triceps, and wrist stabilisers support weight during the hold, strengthening and maintaining joint integrity.
- Boosts Spinal Alignment and Posture
- Better posture in daily life is strongly related to the straight-line stance, which teaches the body to maintain a neutral spine under pressure.
- Activates the legs and glutes.
- A proper plank engages the entire posterior chain, including the quadriceps, hamstrings, and glutes, to keep the line.
- Develops Focus and Mental Resilience
- Mental stamina is developed by holding a plank past comfort. The stance teaches the mind to remain composed and in the moment even when the body wants to give up.
- Stress Reduction by Focus
- There is no space for daydreaming during the total-body engagement. Focused attention is a meditative side effect of phalakasana.
Step-by-Step Instructions
Key Principles
The body should form one straight line. There is a single, continuous line from head to heels, not a peak (hips up) or a sag (hips down).
- Step 1: Starting Position
Begin on all fours in a tabletop position. Wrists directly under shoulders, knees under hips. - Step 2: Step the Feet Back
Step both feet back so the legs straighten. Toes tucked under. From the top of the head to the heels, the body makes a straight line. - Step 3: Engage the Core
Draw the navel toward the spine. Press the heels back. Lift the front thighs. The whole body should feel firm and continuous. - Step 4: Align the Shoulders over the Wrists
Shoulders directly above the wrists. Expand your upper back by pressing the floor away. Maintain a neutral head position while looking slightly ahead of the hands. - Step 5: Final Position and Hold
Hold the position. Beginners: 15–30 seconds. Intermediate: 30–60 seconds. Advanced: 60–120 seconds. Breathe steadily throughout. - Step 6: How to Come Out of Phalakasana
Lower the knees gently to the floor. To loosen the shoulders and wrists, return to the child’s pose for five breaths.
Breathing in Phalakasana
Slow, steady, even breath. 4 seconds in, 4 seconds out. Resisting the urge to hold your breath is the temptation. The breath maintains the strength of the hold.
Preparatory Poses Before Phalakasana
- The initial form that increases wrist tolerance is the tabletop position.
- Cat-Cow mobilises the spine and shoulders.
- A modified variation of the knee-down plank that strengthens the base.
- Downward-Facing Dog Prepares the Shoulders.
- See our core strength plank guide for a comprehensive plank-strengthening routine.
How to Get Into Phalakasana (Plank Pose)
Shall we follow the instructions to enter the Plank Pose? It all comes down to paying attention to alignment; it’s not very difficult.
- Step 1: Start from All Fours
As if you were going to crawl, get on all fours. - Keep your knees beneath your hips and your wrists directly beneath your shoulders.
- Step 2: Stretch Out Those Legs
Step your feet back one at a time from this stance until your legs are completely extended. - Your heels should push back (but not fall) as your toes are tucked under.
- You are currently performing a high push-up on your hands and toes.
- Step 3: Engage Your Core
Pull your belly button towards your spine. In order to prevent lower back discomfort, this is crucial.
Think about drawing the front ribs toward each other. - Step 4: Straighten Your Body
Don’t droop your hips or elevate your butt into the air; instead, maintain a straight body from head to heels. That stance is what you want—flat and plank-like. - Keep your head in line with your spine as you extend your neck and look down at the mat, not too far ahead or back.
- Step 5: Hold It, Breathe Deep
Maintain the stance for as long as it feels nice, but it should still be difficult. Work your way up to longer holds gradually, starting with 15–20 seconds.
Variations for Phalakasana
Plank Pose is not as simple as it first appears! Here are some variants you can try if you want to add some spice or are not quite ready for the full version.
Knee Plank (Beginner-Friendly)
- Drop your knees to the floor if the standard Plank seems too strenuous. This variant gives you a terrific workout without putting undue strain on your core.
Forearm Plank
2. Bring your forearms to the floor while maintaining your elbows directly beneath your shoulders for a more difficult task. This variation works your upper body like a boss and calls for stronger core engagement. The Elbow Plank stance has been held for the longest duration ever recorded—20 minutes and 15 seconds.
Side Plank (Vasisthasana)
3. Want to focus on your obliques? Turn your torso on one side, stack your feet, and raise one arm toward the ceiling from your standard plank position. This helps with balance and trains your core in a completely different way.
Cautions and Things to Watch Out For
Plank Pose has difficulties, just like any other yoga pose. Let’s go over some things to be aware of because if done incorrectly, it can result in strain or damage.
- Don’t Let the Hips Sag
- Letting the hips sink is one of the most frequent faults made in Phalakasana. Your lower back is strained as a result, which may cause pain or damage. Draw your belly button toward your spine and contract your core to prevent this.
- Avoid Overarching the Back
- Overarching your back is another no-no. Keep your chest from collapsing and ensure that your spine is in a neutral position. To support your back, maintain a strong core and active shoulders.
- Shoulder Positioning
- Don’t shrug your shoulders up to your ears. Make sure they are stacked directly over your wrists and keep them down and away from your neck. By doing this, needless stress on the shoulder joints will be avoided.
- Wrist Sensitivity
- Plank Pose might be challenging if your wrists are sensitive. To ease the pressure, try working on your forearms or placing yoga blocks beneath your hands. To keep your wrists flexible, you can also extend them both before and after.
- Knee or Lower Back Pain
- You should adjust the stance if you feel any soreness in your lower back or knees. Try the variation of the knee plank and concentrate on using your core muscles to prevent it.
- Not Engaging the Core
- Although phalakasana may appear straightforward, its advantages are lost if your core muscles aren’t being used. Keep everything focused and tight; visualise your body as a solid, straight line.
Pro Tips for the Perfect Phalakasana
- Activate Your Legs: Don’t forget about your legs! To increase stability, engage your thighs and press back through your heels.
- Line Up Your Eyes: Look down at the mat, right in front of your hands, to maintain a neutral neck. This will keep your neck from being strained.
- Breathe Deep: When you’re in a difficult pose, it’s simple to forget to breathe, but deep breathing will keep you composed and focused.
- Concentrate on Form Over Time: Although it may be tempting to hold the plank for as long as you can, it’s more crucial to concentrate on correct alignment and form. Quality over quantity, always!
Step-by-Step Sequence
- On the tabletop, begin. Drop to your hands and knees with your wrists directly under your shoulders and your knees under your hips.
- Lay out your hands. To keep the wrists safe, apply uniform pressure to the entire palm and the bases of each finger.
- Retrace your feet. Stretch both legs straight behind you, tucking your toes and landing on the balls of your feet.
- Layer the shoulders. Make sure your body creates a single, straight line from head to heels and that your shoulders are exactly over your wrists.
- Extend the blades of your shoulders. To keep the upper back from collapsing and the chest from becoming narrow, gently pull each shoulder blade apart and down the back.
- Activate the core. To ensure that the hips neither sag nor pike up, draw the navel into the spine, firm the thighs, and gently tuck the tailbone.
- Breathe and hold. For five to ten breaths, maintain a long neck and a slightly forward gaze while breathing steadily. For three to five rounds, release to your knees and repeat.
Common Mistakes to Avoid
- Allowing the hips to rise toward the ceiling or fall toward the ground.
- Between the shoulder blades, collapsing the chest.
- Instead of breathing steadily, hold the breath.
- Lowering the head or lifting the neck.
- Instead of maintaining the shoulders packed over the wrists, the hands are placed too far forward.
How Long Should You Hold Phalakasana?
Beginners can progressively increase the duration from 15 to 30 seconds, or around five breaths. A great objective is to hold with perfect alignment for one to two minutes with practice. Duration is always inferior to quality; therefore, stop as soon as your form falters.
Conclusion
Phalakasana, also known as Plank Pose, is a full-body workout in one static position rather than simply a basic yoga pose! It builds strength and even mental focus. Thanks to all the variants and adaptations, you can find a version of yoga that suits your body no matter where you are in your path.
Thus, the next time you lay out your mat, be sure to take a bit more time to master your plank. You’ll feel stronger and more rooted, and your body will appreciate you for it.
FAQs
What are the benefits of Phalakasana?
A stronger core, arms, shoulders, and wrists, better posture, a more stable spine, better balance, and increased stamina are the key advantages. Additionally, it gets the body ready for complex arm balances.
What is the Sanskrit name for the Phalakasana?
The Sanskrit name for the plank pose is Phalakasana, from “phalaka” (plank or board) and “asana” (pose).
What does Phalakasana mean?
Phalakasana, which translates to “plank pose,” holds the body firmly and straight like a flat wooden plank.
How long should you hold Phalakasana?
With proper alignment, beginners should hold for 15 to 30 seconds before moving on to 1 to 2 minutes. Always prioritise form over time.
Is Phalakasana a yoga pose or an exercise?
Plank is both. Phalakasana is a yoga pose that is used to develop strength and steadiness in Hatha and Vinyasa routines.
References:
- Bijalwan, H. (2026, July 12). Phalakasana (Plank Pose): Benefits, steps & meaning. Mimamsa Yogshala. https://www.mimamsayogshala.com/blog/how-to-do-plank-pose?
- Zehra, S. (2026, August 11). Phalakasana (Plank Pose): Steps, Benefits & Daily Guide. Habuild Blogs. https://habuild.in/habitology/asana-mudra/phalakasana-plank-pose/
- Plank Pose Yoga(Phalakasana)| Yoga sequences, benefits, variations, and Sanskrit pronunciation | Tummee.com. (n.d.). Tummee.com. https://www.tummee.com/yoga-poses/plank-pose
4 Comments